

Entering Component Information
This chapter describes the specific information to be entered on the component property sheets. The chapter is organized like the Create menu itself, describing the component property sheets in order:
In general, you should fill in the property sheets for the components in the order you see listed here. However, not all components are used in all networks.
Components for Different Types of Networks
Four different network types are possible. The component property sheets required for each are described in the following sections.
Components for a One Community Network, without Oracle Names
The following component property sheets are required for a network that has no Interchange and does not use Oracle Names:
- Database (can be defined from the listener property sheet)
- Client Profile (Network Manager completes this automatically based on input from other property sheets, but you may want to edit it.)
If you want the component names to include domains other than the default .WORLD domain, use the following property sheet first:
If you want to provide aliases for local databases, use the following property sheet:
If you want to include an Oracle Rdb database, use the following property sheet:
If you want to include an Oracle Gateway to a non-Oracle database, use the following property sheet:
If you want to include a SQL*Net version 1 connect string and alias in the configuration file along with SQL*Net version 2 connect descriptors, use the following property sheet:
Note: If you want to import a file of SQL*Net version 1 connect strings, use Import V1 Strings from the Special menu.
If you want to use the agent of the Oracle Enterprise Manager, use the following property sheet:
If you want to use Oracle Trace across your network, use the following property sheet:
Components for a Multi-Community Network, without Oracle Names
If the network includes two or more communities, you may use all the above property sheets, as well as the Interchange property sheet. You may also need to edit the Client Profile property sheet if you have different client types in the same community.
Components for a One Community Network, including Oracle Names
If your network has only one community, but uses Oracle Names, you must use the following property sheets:
The following property sheets are optional:
- If you want multiple domains in the network, use the following property sheet first:
- If you are using a delegated administration scheme that includes multiple regions, use the following property sheet:
- Foreign Region (available from the Create Menu)
- If you have alternate names for a local or remote database, use the following property sheet:
- If you want to include an Oracle Rdb database, use the following property sheet:
- If you want to include an Oracle Gateway to a non-Oracle database, use the following property sheet:
- If you want to include a SQL*Net V1 connect string in the configuration file along with V2 connect descriptors, use the following property sheet:
- SQL*Net V1 Connect String
Note: If you want to import a file of SQL*Net V1 connect strings, use Import V1 Strings from the Special menu.
- If you want to use the agent of the Oracle Enterprise Manager, use the following property sheet:
- If you want to use Oracle Trace across your network, use the following property sheet:
Components for a Multi-Community Network, including Oracle Names
A network that includes one or more Interchanges and Oracle Names would use all of the property sheets described in the previous section, as well as the Interchange property sheet.
Step-by-Step Through the Component Property Sheets
All of the network object, or component, property sheets are described in the following sections. Each property sheet is made up of a General page, and usually other pages as well. The General page includes basic information about the network component. The other pages, which vary among network objects, may be required or optional. Generally, Address pages are required, and all others are optional.
Attention: Be sure to complete property sheets for all the components of each type before moving on to the next type of property sheet. For example, complete property sheets for all the communities before opening a node property sheet; complete property sheets for all the nodes before moving on to listeners.
The reason for doing this is that the tool makes available information from one set of property sheets to subsequent sets. If you have not defined a community, for example, you will not be able to complete the property sheet for a node that is on that community.
Attention: Remember to save your entries regularly. See "Saving the Configuration Information" in Chapter 3.
Domain
A domain is a naming structure for network objects. By grouping network components into domains, a network administrator can make the maintenance of unique names across a large organization easier.
Note: If you have only one domain in your network, the default domain .WORLD is appended to its components, and you do not need to use this property sheet.
In large networks, multiple domains are usually arranged hierarchically. Domains are described in Chapter 3 of Understanding SQL*Net and in Chapter 4 of the Oracle Names Administrator's Guide.
Use this property sheet, shown in Figure 5 - 1, if your network includes multiple domains.
Note: You must be in domain layout to access this property sheet.
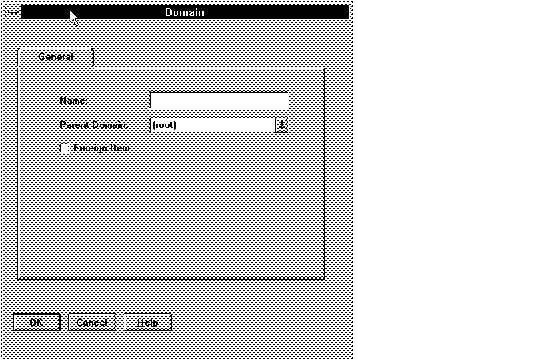 Figure 5 - 1. Domain Property Sheet
Name
Enter the name of the domain. The complete name cannot be more than 240 characters.
Domain
Select the parent of the domain you are creating. If this is a new network, the only available choice is (root). If you do not have a hierarchically named network, the default choice of (root) is appropriate. However, if you do have a naming structure that includes hierarchical domains, select the parent domain from the drop-down list.
Note: You must define the domains from right to left, or root to branch, or from parent to child. For example, if the network contains three hierarchically related domains, as in WEST.ACME.COM, you must use this property sheet to define COM before you can define ACME, and ACME before you can define WEST.
Foreign Item
This item is relevant only if your network includes Oracle Names and includes more than one administrative region. Select the check box if the domain is foreign; that is, if the domain is in another administrative region. See the Oracle Names Administrator's Guide for more detailed information.
Close the Property Sheet
Select OK to create the domain and close the property sheet.
Repeat this procedure to create any other domains in the network.
Community
A community is a group of nodes using TNS-based software that communicate using the same transport protocol. Clients, servers, Interchanges, and Names servers are all members of one or more communities. Information about communities is an important part of network configuration; it appears in many configuration files. Figure 5 - 2 shows the property sheet for defining communities.
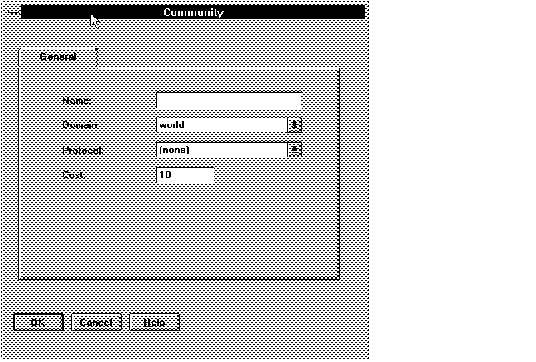 Figure 5 - 2. Community Property Sheet
Name
In this field, enter the name of the community. A common convention is to include the underlying protocol in the name; for example, TCPCOM.
Domain
If there is only one domain, WORLD is selected automatically; you can ignore this field. If there is more than one domain in the network, select a domain for the community from the drop-down list.
Protocol
This field contains a drop-down list of available transport protocols. To select from the list, select the button and scroll down the drop-down submenu that appears. Highlight the protocol you want. If the protocol you want does not appear on the list, select "User defined."
Cost
Note: The cost parameter is important only when there are alternate paths available between clients, Interchanges, and servers on the network.
The cost of a community is a measure of its relative efficiency in transferring data. The default of 10 automatically appears in the field. If the protocol is very slow or the community has a very heavy traffic load, you may wish to assign a higher cost; if it is very fast, you may wish to assign a lower cost. The range is between 1 and 100. In multi-community networks, the Interchange makes navigation decisions based in part on the comparative costs of the communities it connects. See the Oracle MultiProtocol Interchange Administrator's Guide for more information.
Close the Property Sheet
When you are satisfied with the information in the fields, press OK to create the community and close the property sheet. The name of the community you entered will appear in the right column of the component property sheet menu. If you decide not to keep your entries, press Cancel to close the property sheet without creating a community.
Repeat this procedure to create any other communities in the network.
Node
A node is any computer that provides a service on a network. You must define nodes that provide a service, such as an Oracle Server, an Interchange, or a Names server. Use the property sheet shown in Figure 5 - 3. A node may contain database servers, an Interchange, a Names server, or any combination of these services, as well as client applications. Information about the node is necessary to identify locations of the services on the network.
Note: Machines that act only as clients do not need to be defined as individual nodes. The Network Manager automatically generates client profiles that are adequate for most clients.
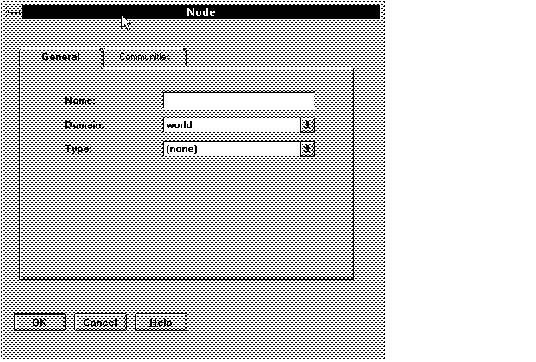 Figure 5 - 3. Node Property Sheet: General Page
General Page
Name
Enter the name of the node. Each node must have a unique name within its domain.
Domain
If you are not using a hierarchical naming structure, ignore this field. The tool will automatically append .WORLD to the end of the node name. If you are using a hierarchical naming structure with Oracle Names, select from the drop-down list of possible domains. If you have not yet created a delegated domain structure, the only choice is WORLD. To create other domains, return to the Domain property sheet.
Type
Select the operating system of the node from the list of choices available for this field. If the operating system of the node is not on the list, select User Defined.
Note: If the operating system of the node is Windows NT, select UNIX as the node type, because both UNIX and NT servers require the same parameter (Oracle Home) to be configured when you define the database. Network Manager provides that parameter when you configure the database.
Communities Page (Required)
Select the folder tab to display the Communities page. Use this page to assign the node to one or more communities. All available communities are listed in the right window. To assign a node to one or more communities, select one or more communities and select the Add button. The selected communities will appear in the left window.
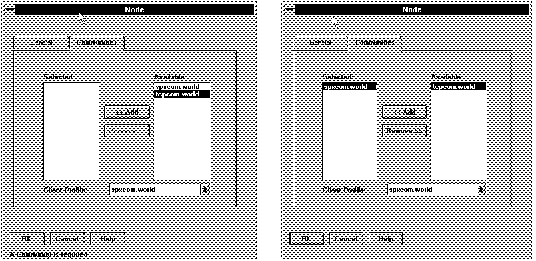 Figure 5 - 4. Communities Page Before and After a Community Is Selected
Client Profile
This is a drop-down list. When you enter the community information for this node, a client profile is automatically entered in this area. If you want to select a different client profile, select from the other existing client profiles in the drop-down menu. If you want to create a new client profile, use the Client Profile property sheet.
Close the Property Sheet
When you are satisfied with the information in the fields, press OK to create the node and close the property sheet. The name of the node you entered will appear in both the Tree View and the Map View windows. A Client Profile will also appear. If you decide not to keep your entries, press Cancel to close the property sheet without creating a node.
Repeat this procedure to create the other nodes on the network.
Note: Refer to Appendix A for an example of a completed property sheet for a node.
Interchange
Use the property sheet shown in Figure 5 - 5 to define the Interchanges in the network. To define the Interchange, you must use the General page and the Addresses page. The other pages are not required, but allow you to tune the Interchange and activate optional features.
General Page (Required)
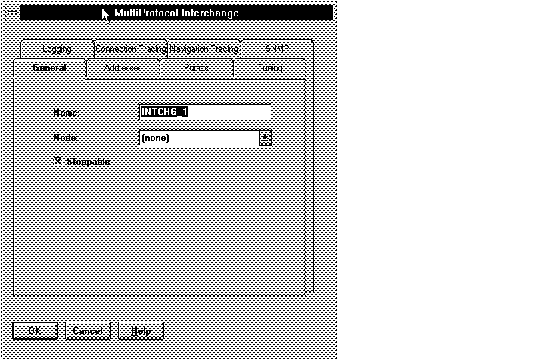 Figure 5 - 5. Interchange Property Sheet
Name
A default name for the Interchange automatically appears in this field; you may change it if you wish by selecting the field and entering an alternative.
Node
Enter the name of the node the Interchange is on by selecting from the drop-down list of available nodes. Only nodes that are members of two or more communities are in the list, because Interchanges must connect two or more communities.
Stoppable
This check box indicates whether the Interchange can be stopped by the Interchange Control Utility, INTCTL. If the check box is selected, the Interchange is stoppable; when you select it, the check box toggles to Not Stoppable.
Addresses Page (Required)
Use this page to define the addresses of the MultiProtocol Interchange. Every Interchange must be in two or more communities.
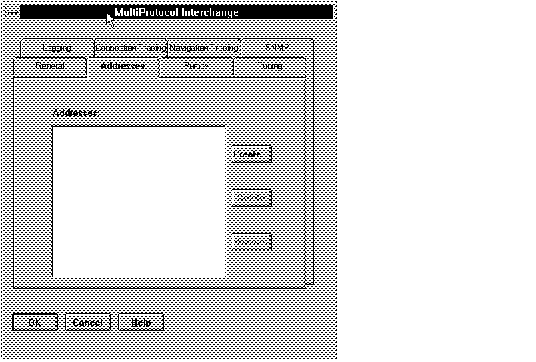 Figure 5 - 6. Interchange Addresses Page
Creating an Address
Select Create to bring up an Address window in which to enter address information. You must open this window at least twice, because each Interchange must have at least two addresses, one for each protocol.
Deleting an Address
If you have created an address for an Interchange and want to delete it, you can do so by selecting an address in the list box and pressing Delete.
Demoting an Address
If the Interchange has more than one address, you can control the order in which addresses are tried. When you first enter address information, the addresses appear in the list box in the order they were entered. However, by selecting an address and pressing Demote, you can move an address farther down the list.
For example, if a client were on both the TCP/IP protocol and the SPX/IPX protocol, and it needed to make a connection across an Interchange that was also on those two protocols, the position of the Interchange addresses in the address list would determine which protocol was used to reach the Interchange. Select the Interchange address that would be most efficient, or which would help with load balancing.
When you select Create, a window like that shown in Figure 5 - 7 appears.
 Figure 5 - 7. Address Window
In the Community field, press the arrow and select one of the communities from the drop-down list. When you do, the field in the middle of the window for Protocol Details will change to show the parameters appropriate for the protocol of the community you have selected. For example, Figure 5 - 8 shows an Interchange address window for an address using the SPX/IPX protocol.
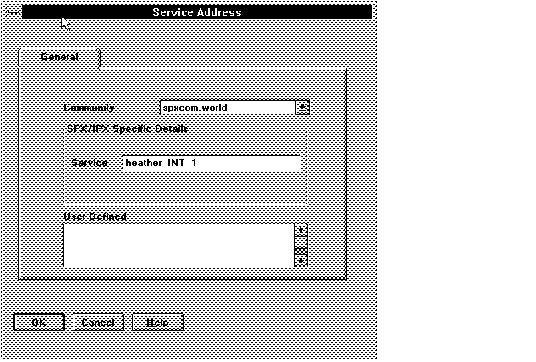 Figure 5 - 8. Interchange SPX Address Window
For many protocols, you need only select OK to accept the information automatically entered in this field. Other protocols require additional information. Several protocols require non-global parameters in addition to the global parameters included in the addresses listed in the TNSNAMES.ORA file. These non-global address parameters must be included in a PROTOCOL.ORA file for each node. The following protocols require parameters to be listed in PROTOCOL.ORA:
These protocols have LOCAL_LOOKUP as one of their parameters. This parameter acts as a pointer to a partial address in a PROTOCOL.ORA file. For APPC/LU6.2 and ASYNC, the LOCAL_LOOKUP parameter is included in the protocol-specific parameters text field, and you must enter the value for that parameter. For OSI4, enter the LOCAL_LOOKUP parameter in the User Defined Parameters text field (see next section).
Note: The PROTOCOL.ORA file is not generated by Network Manager. For further information, see Appendix A of Understanding SQL*Net and the Oracle operating system-specific documentation for your platform.
User Defined Parameters
If you want to configure an address that includes parameters that do not appear in the Protocol Specific Details text field, or that uses a protocol that is not among those in the drop-down list of available protocols, enter the parameters in the User Defined Parameters text field. The syntax is (parameter=value). Each parameter/value pair must be surrounded by parentheses. For more information about the syntax of the configuration files, see Appendix B in Understanding SQL*Net. For examples of configuration files, see Appendix A of this Guide.
Note: When you enter information in the User Defined Parameters field, you must enter it exactly as it will appear in the configuration file (including punctuation). For example, a LOCAL_LOOKUP parameter for OSI4 would be entered as follows:
(LOCAL_LOOKUP=hqhw202)
See the Oracle operating system-specific documentation for your platform for further information.
When you are satisfied with the entries, select OK to return to the Interchange Addresses page.
Select Create again and repeat these steps to provide information for each of the communities of which the Interchange is a member (there must be at least two).
Note: The entries in any window that is the "child" of another window are lost when the "parent" window entries are canceled. Therefore, if you select OK to accept the addresses and return to the Interchange property sheet, and then select Cancel on the Interchange property sheet, you lose your entries on the Address window.
When you have selected both addresses, the Interchange Address page will look like that shown in Figure 5 - 9, which shows addresses for a TCP/IP community and an SPX/IPX community.
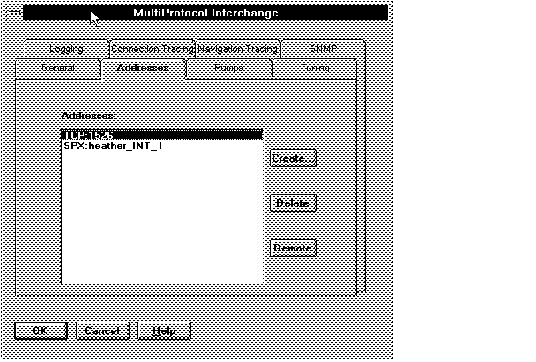 Figure 5 - 9. Completed Interchange Address Page
Select another folder tab to provide optional parameters for the Interchange, or press OK to return to the Network Manager Tree View or Map View window. The Interchange you have created appears in that window.
Pumps Page (Optional)
Select the Pumps folder tab to set parameters for the pumps in the Interchange. This page is optional because the Network Manager provides defaults for the pump parameters. However, you may want to set the parameters to different values.
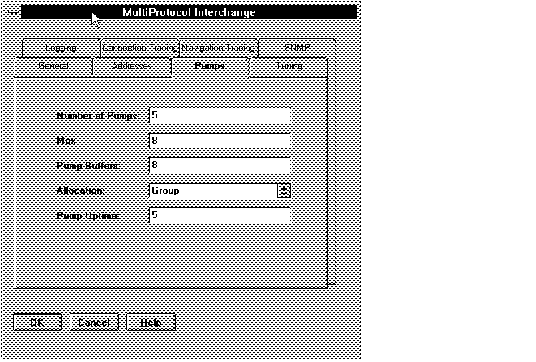 Figure 5 - 10. Interchange: Pumps Page
Number of Pumps
This parameter determines the maximum number of data pumps on a Connection Manager that can be running simultaneously. This is a required parameter. The default of 5 automatically appears in this field; you may change it if you wish. See Chapter 2 of the MultiProtocol Interchange Administrator's Guide.
Max Connections
This parameter determines the maximum number of connections that each pump can maintain simultaneously. This is a required parameter. The default of 8 automatically appears; you may change it if you wish. See Chapter 2 of the MultiProtocol Interchange Administrator's Guide.
Pump Buffers
The maximum amount of buffer space (in Kbytes) allocated for all connections passing through each pump. The default is 8K per pump.
Allocation
Describes how incoming connections are allocated to new or existing pumps. The choices are DISTRIBUTE and GROUP; the default is GROUP.
Pump Uptime
The number of minutes a pump remains active after the last connection disconnects. The default is 5 minutes.
When you are satisfied with the values on this page, select another folder tab to configure more optional parameters for the Interchange, or press OK to return to the Network Manager Map View or Tree View window.
Tuning Page (Optional)
Select the Tuning folder tab to set other parameters that influence the performance of the Interchange.
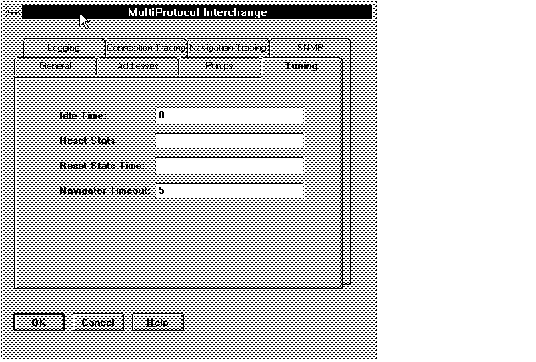 Figure 5 - 11. Interchange: Tuning Parameters
Idle Time
The number of minutes a connection can remain idle before the Connection Manager terminates it. The default is 0, which means that a connection will not time out. If you want the Connection Manager to terminate an idle connection, specify the number of minutes of idle time here.
Reset Stats Interval
The interval over which Interchange statistics are gathered. The interval is expressed in number of minutes, or by one of the keywords: DAY, WEEK, MONTH, YEAR. There is no default. Unless this parameter is specified, statistics will gather for the life of the Interchange.
Reset Stats Time
A specific time, expressed in hours and minutes, at which the Interchange should reset its statistics,if Reset Stats Interval has been specified. Range is 00:00 to 23:59. There is no default.
Navigator Timeout
Indicates the TIMEOUT_INTERVAL value (in minutes), which is the amount of time a Navigator assumes another Interchange in the network is unavailable to receive a connection when it has been diagnosed as unavailable. The default is 5 minutes.
Logging Page (Optional)
Select the Logging folder tab if you wish to change the default settings for logging information for the Interchange. The Logging page is shown in Figure 5 - 12.
 Figure 5 - 12. Interchange: Logging Page
The parameters are as follows:
Logging Level
Indicates whether there is statistical logging for the Connection Manager and the Navigator. OFF means there is no logging for either the Connection Manager or the Navigator. ON means there is logging for the Connection Manager only. ERRORS means that navigation errors are logged, while ALL means that all navigation requests are logged. The default is OFF. See the MultiProtocol Interchange Administrator's Guide for further information.
Connection Log File
Indicates the name of the file to which log output for the Connection Manager is sent. Enter a filename in this field only if you want to override the platform-specific default.
Navigation Log File
Indicates the name of the file to which log output for the Navigator is sent. Enter a filename in this field only if you want to override the platform-specific default.
Logging Interval
Indicates the interval in minutes between logs of the Interchange statistics. The default is 60 minutes.
Connection Tracing (Optional)
Select this folder tab if you wish to change the default settings for tracing information for the Connection Manager. The screen shown in Figure 5 - 13 appears.
 Figure 5 - 13. Connection Manager Tracing Details
The parameters are as follows:
Tracing Level
Indicates the level at which the Connection Manager should be traced. See the Oracle Network Products Messages Manual for details on initiating and using the tracing feature. This parameter is optional; the default is OFF. Other choices are USER, which provides limited information, and ADMIN, which provides more detailed information.
Trace File Name
The name of the output file from a trace session for the Connection Manager. Use this field only to override the platform-specific default.
Trace Directory
Indicates the location to which any Connection Manager trace file will be generated. Use this field only to override the platform-specific default.
Navigation Tracing (Optional)
Select this folder tab if you wish to change the default settings for tracing information for the Navigator. The screen is similar to the Connection Manager Tracing screen, and the parameters are the same. See Figure 5 - 13.
SNMP (Optional)
Select this folder tab if you want this Interchange to be monitored using Oracle SNMP Support. A page appears on which you can enter parameters to control the Interchange subagent that is used if Oracle SNMP Support is desired. The page looks like that shown in Figure 5 - 14.
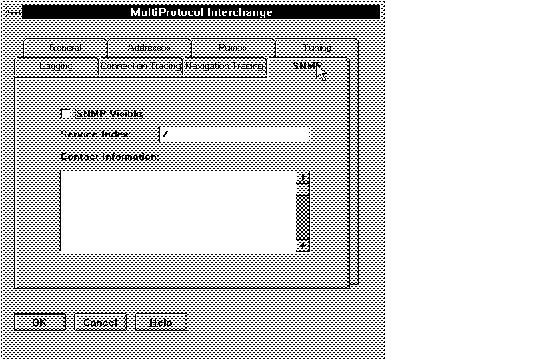 Figure 5 - 14. SNMP Interchange Details Window
The parameters are as follows:
SNMP Visible
Select this button to make this Interchange visible to the Master Agent (that is, to enable Oracle SNMP Support).
Service Index
The SNMP Index provides a number that is a unique identifier of this service on this node. Enter an Index number here; it can be any integer between 1 and 2147483647.
Note: If there is SNMP-manageable third party software on this node (such as a mail or directory service), be sure that it does not have a duplicate SNMP Index.
SNMP Contact
Enter the name or other identifier of the person who administers this service. This contact information may be made available upon request to users or managers who seek a solution to a problem reported through SNMP. Oracle recommends that the contact information be limited to no more than 255 characters. You may want to include a phone number.
For further information about using SNMP in your Oracle network, see the Oracle SNMP Support Reference Guide and Oracle operating system-specific documentation for your platform.
Close the Property Sheet
When you are satisfied with your entries, press OK to modify the network definition and close the property sheet. If you decide not to keep your entries, press Cancel to close the property sheet without affecting the network definition.
Repeat this procedure to create the other Interchanges on the network.
Note: Refer to Appendix A for an example of a completed property sheet for an Interchange and its configuration files generated by the Network Manager.
Listener
Each database requires a network listener to listen for connection requests. Use the listener property sheet shown in the following figures to enter the parameters and the addresses of the network listeners.
General Page
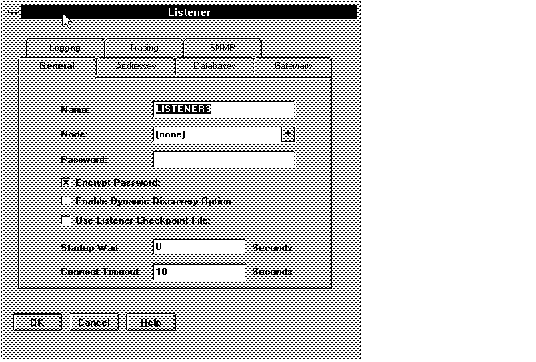 Figure 5 - 15. Listener: General Page
Name
The default name, LISTENER, automatically appears in this field. You may change it if you wish by erasing the current name and entering a new one. It is generally a good idea to keep the default name, as the Listener Control Utility (described in Chapter 5 of Understanding SQL*Net) expects it. The Network Manager adds the name of the node (including its domain) to the end of the name you specify. For example, a listener with the default name LISTENER on a node named IRIS in the default domain .WORLD would have all these elements in its complete name, as follows: LISTENER_IRIS.WORLD
There can be multiple listeners with the same name in a network, but multiple listeners on the same node must have different names. If you have more than one listener on a node, provide a unique name for each of them (for example, LISTENER1, LISTENER2, and so forth).
Note: An easy way to create numbered listeners on a node is to select the listener icon from the tool bar and drag it onto the node on the left side of the Tree View window.
Node
Enter the node on which the listener resides. If there is only one node created for the network, its name appears automatically in this field. If there is more than one, select from among the choices in the drop-down list of local nodes. (Only nodes that exist in the local domain are on the list.)
Password
Enter a password in this field if you want to limit who can perform certain administrative tasks against the listener, such as STOP or RELOAD, using the listener control utility. If there are no entries in this field, then anyone with access to the Listener Control Utility can run any of its commands. In other words, there is less security. Enter only one password if you want the password to be encrypted. A password should be fewer than 30 alphanumeric characters.
Encrypt Password
When this check box is selected (the default), the password is encrypted when it appears in the LISTENER.ORA file. Encrypting the password enhances network security, since the LISTENER.ORA file may be read by people who are not authorized to perform DBA tasks against the listener. If you do not encrypt the password, it appears in LISTENER.ORA as clear text. Select the checkbox to toggle it off and on. The default is for encryption to be on.
Enable Dynamic Discovery Option
Select this check box if you want this listener to use the Dynamic Discovery Option. By default, the option is set to OFF. If you select this checkbox, the listener will attempt to register its databases with a well-known Names Server, and clients will seek the addresses of the database services from a well-known Names Server rather than from a TNSNAMES.ORA file or other Names Servers in the network. For more information about the Dynamic Discovery Option, see the Oracle Names Administrator's Guide
Use Listener Checkpoint File
Select this check box if you want to be able to override LISTENER.ORA parameters using the Listener Control Utility (LSNRCTL) and to have those changes be persistent -- that is, to remain even if the listener is stopped and restarted. If you select this checkbox, LSNRCTL saves its changes to a checkpoint file, which it saves and continues to use indefinitely. If you do not select this check box, you can set parameters using LSNRCTL, but the changes do not endure when the listener is stopped or reloaded. For further information about LSNRCTL, see Chapter 5 in Understanding SQL*Net.
Startup Wait Time
This parameter sets the number of seconds that the listener sleeps before it responds to the first listener control STATUS command. This feature assures that a listener with slow communication lines has adequate time to start up before responding to a STATUS request. The default of 0 means that the listener responds to the first STATUS command without any delay. Any positive numeric value is acceptable.
Connect Timeout
This parameter sets the number of seconds that the listener waits to get a valid SQL*Net V2 connection request after a connection has been started. The default is 10 seconds; the range is 0-99.
Addresses Page (Required)
Select the Addresses folder tab to create addresses for the listener. The Addresses page, shown in Figure 5 - 16, appears.
Attention: You must enter the listener addresses before defining the databases, because the community choice available when defining prespawned dedicated server processes is determined by the protocols in the listener addresses.
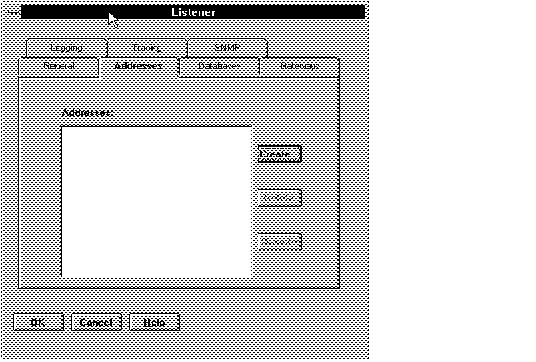 Figure 5 - 16. Listener: Addresses Page
The Addresses page for a listener is just like the Addresses page for the MultiProtocol Interchange. Refer to the Interchange Addresses section earlier in this chapter.
Databases Page (Optional)
To define a new database for this listener, select the Databases folder tab. A page appears like that shown in Figure 5 - 17. Select Create if you want to define a new database.
Note: If you want to choose a database that has already been created, select a database from the Available column, and select Add. The selected database will move to the Selected column. To edit a Selected database, double-click on it.
Note: Network Manager supports up to 50 databases per node.
 Figure 5 - 17. Listener: Databases Page
When you select Create, choose an existing database to edit, or select Database from the Create menu or Network Object Bar, the property sheet shown in Figure 5 - 18 appears.
 Figure 5 - 18. Database Property Sheet
In the database property sheet, enter information about the database.
Database: General Page
Some of the information that appears on this page is determined by information you have already given the Network Manager. The operating system-specific details, for example, are determined by the node type (operating system) that you supplied on the Node property sheet. In the window shown in Figure 5 - 18, for example, the node type was defined as UNIX in the Node property sheet, so the operating system-specific parameters requested are for UNIX. Provide the database environmental variable in this field.
Note: If you selected User as your choice of node type on the Node property sheet, you must enter the required parameters for the operating system in the User Defined Parameters text field on the Location Details page.
Name
Enter the service name of the database in this field. The service name is the short name that users use in connection requests. It is mapped to the connect descriptor that describes the exact location of the database on the network. The service name is stored either in TNSNAMES.ORA (if you are not using Oracle Names or a native naming service such as NIS), by a Names server (if you are using Oracle Names), or by a native naming service. The service name of the database should be the same as the global database name listed in the database initialization parameter file. The global database name consists of the database name and the domain in which it resides. You need enter only the database name; the domain will be appended automatically.
Note: If you want an easier to use name, you can create aliases for the service name using the Alias property sheet.
Node
Select the node where the database resides from the list box that appears. If only one node has been defined for the network, that node name automatically appears in this field. (Only nodes that exist in the local domain are on the list.) This field should not be changed if this property sheet has been launched from the Listener property sheet.
SID
Enter the system identifier (SID) in this field.
Node Details
This text field requires the value of the operating system-specific parameter used to set up the environment of the database. For example, if the database were on a UNIX node, the parameter would be ORACLE_HOME and the value would be something like
/usr/oracle
If the database were on a VMS node, the parameter would be PROGRAM and the value would take the form
'disk$:[oracle.rdbms]orasrv.com'
See the operating system-specific documentation for your platform for further information about the operating system-specific environment parameter.
Databases: Listeners Page
If you entered the database property sheet from the Create Menu or by using an icon from the Network Object Bar, select this folder tab to choose a listener. A window like that in Figure 5 - 19 appears.
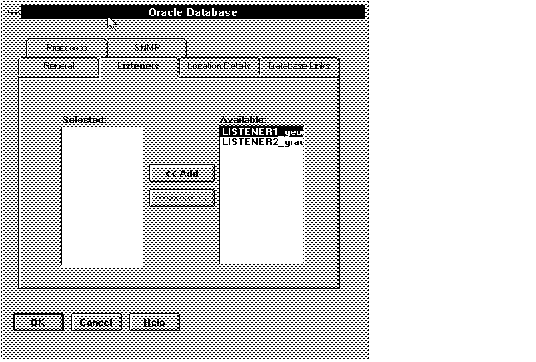 Figure 5 - 19. Database Page: Listeners
All the listeners in this domain appear in the Available list. Select one or more listeners and press Add to move them to the Selected list.
Note: Usually, the listeners for a database are on the same node as the database. However, this is not required. If you have two or more listeners listening for the same database, the client will randomize its connection requests among the listeners, so that none of them is overburdened. For more information about listener load balancing, see Chapter 5 in Understanding SQL*Net.
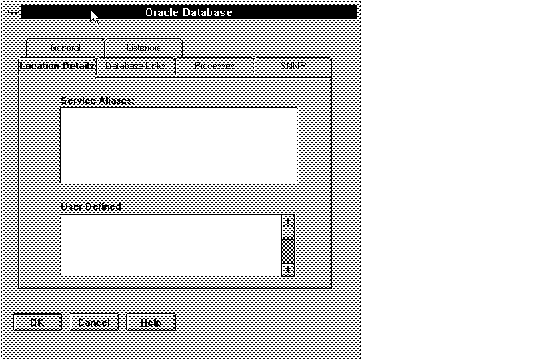 Figure 5 - 20. Database: Location Details Page
Service Aliases
This field is read-only; it displays a list of any aliases that have been created for this database. If you want to create aliases (alternative service names) for this database, use the Aliases property sheet.
User Defined Parameters
The User Defined text box can be used to enter certain optional parameters that Oracle Network Manager does not otherwise include. For example, if you want to change the default buffer size of a database, you can do so by entering the following parameter and value into this text box:
(SDU = number)
The number can be anything from one to eight kilobytes, but may be limited by the transport protocol. The default is two kilobytes (2048).
Attention: The parameter and value must be enclosed in parentheses. Your entry will appear as you entered it as part of the description of the database in both the LISTENER.ORA file and the TNSNAMES.ORA file.
Databases: Database Links Page
With Oracle Names, a global database link is automatically created to each database from all others; the link name is the same as the service name of the database. You can create a username and password for the database link, and create multiple qualified links using the Database Link Information page, as shown in Figure 5 - 21.
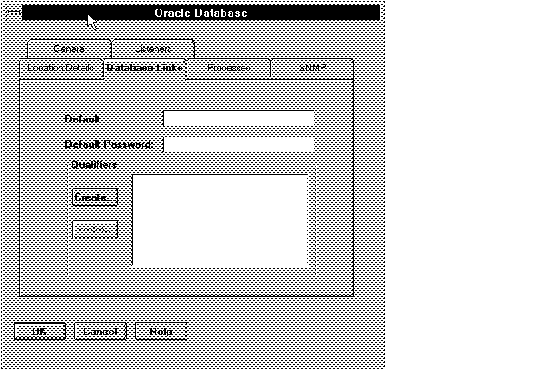 Figure 5 - 21. Database Link Information Window
Default User Name
In this text field, enter the username for this database link.
Default Password
Enter the password to allow access to this database link.
Note: If you do not enter a username and password in these text fields, whoever uses the database link will be able to use their own username and password to make the connection.
Qualifiers
If you want to have multiple database links that provide alternative access, create them using this list box. When you press the Create button, a window like that shown in Figure 5 - 22 appears.
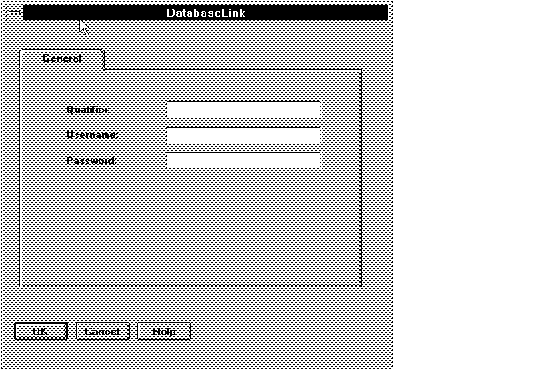 Figure 5 - 22. Database Link Qualifier Window
Qualifier Enter a database link name.
User Name
Enter a username (optional).
Password
Enter a password (optional).
When you are satisfied with your entries, press OK to accept them, close the window, and return to the previous window. If you want to create more qualified database links, select Create again.
Note: For further information about database link qualifiers, see the Oracle7 Server documentation.
Processes Page
Select this folder tab if you want to define prespawned dedicated server processes for the database. The purpose of the prespawned processes option is to reduce connect time by eliminating the need to spawn a process for each new connection request. A page like that in Figure 5 - 23 appears.
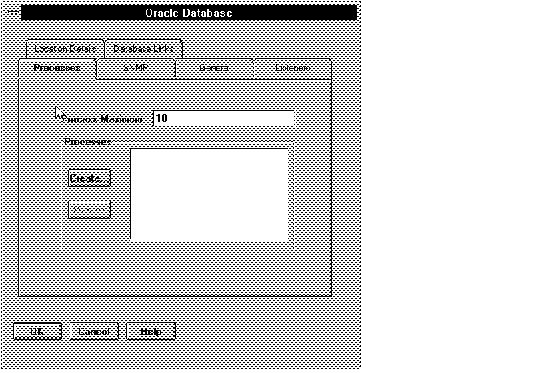
Figure 5 - 23. Prespawned Process Page
In this page, provide the following information:
The maximum number of prespawned processes the listener will create. This number must be at least as many as the sum of the maximum pool size for each protocol (see next window). For greatest efficiency, Oracle Corporation recommends a large value so that processes are always available for new connection requests. The default is 10.
Processes
To define prespawned processes further, press the Create button. The window shown in Figure 5 - 24 appears.
 Figure 5 - 24. Prespawned Dedicated Server Processes Page
Community
Select from this drop-down list the name of the community on which you want the processes to be created. (If a listener listens on more than one community, you can choose whether to have pre-spawned processes on any or all of them; complete this window for each community.)
Pool Size
The pool size is the maximum number of inactive prespawned processes for the listener on the selected community. Choose a number that is greater than 0 but no greater than the Process Maximum value you entered on the previous window.
Time Out
Time out is the time in minutes that an inactive process will wait for the next connection. Enter a value greater than 0. (A value of 0 will allow an inactive process to continue indefinitely, thus wasting machine resources.)
Attention: You must provide values for all four parameters (Process maximum, Community, Pool Size, and Time Out) for prespawned processes to be enabled. If you enter a value for Process Maximum, but fail to provide values for the other parameters, the listener will not start and will report an error loading parameter files. Numerical values should be greater than 0.
When you are satisfied with the information in the fields, press OK to accept your entries and close the window. You again see the Processes page. Press OK to accept your entries and close this window; you are then back at the Database property sheet. If you want to provide information about database links to this database, continue to provide information on this property sheet using Link Info. Otherwise, press OK to return to the listener property sheet.
SNMP Page
Use this page if you want this database to be monitored using Oracle SNMP Support. Select the SNMP folder tab to bring up the SNMP page, shown in Figure 5 - 25.
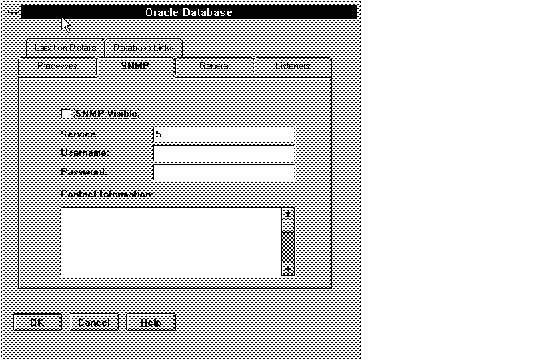 Figure 5 - 25. SNMP Page for a Database
The parameters are as follows:
SNMP Visible
Select this button to make this database visible to the Master Agent (that is, to enable SNMP).
Service Index
Enter a unique identifier for this service on this node, an SNMP Index. The Index can be any integer between 1 and 2147483647; enter it in this text box. Network Manager assigns a number to each service it creates, in the order of creation; you can change it if you wish. If there is SNMP-manageable third party software (such as a mail or directory service) on this node, be sure that it does not have a duplicate SNMP Index. Network Manager assigns a number to each service it creates, in the order of creation; you can change it if you wish.
Username
Enter the username required for the SNMP subagent to access the data it is to monitor. In most cases you can leave this field blank; the default is acceptable.
Password
Enter the password required for the SNMP subagent to access the data it is to monitor. In most cases you can leave this field blank; the default is acceptable.
SNMP Contact
Enter the name or other identifier of the person who administers this service. This contact information may be made available upon request to users or other DBAs or managers through SNMP. Oracle recommends that the contact information be limited to no more than 255 characters, and that a phone number be included.
For further information about using SNMP in your Oracle network, see the Oracle SNMP Support Reference Guide and Oracle operating system-specific documentation for your platform.
Close the Database Property Sheet
When you are satisfied with your entries on the database property sheet, press OK to accept the entries and close the window. If you entered the database property sheet from the listener property sheet, continue entering information on the listener property sheet now.
Listener Logging Page
Select this folder tab to bring up the page in which to enter optional parameters about listener logging, as shown in Figure 5 - 26.
 Figure 5 - 26. Listener Logging Page
Logging File
Use this field only if you want to name the listener log file something other than the platform-specific default.
Attention: Although on many systems the error log file is named with the .LOG suffix, do not include the .LOG suffix when you enter the name of the log file. The Network Manager appends the suffix automatically.
Log File Directory
Use this field only if you want to place the listener log file somewhere other than its platform-specific default location.
Listener Tracing Page
Select this folder tab to bring up a page in which to enter optional parameters about listener tracing. The page looks like that shown in Figure 5 - 27.
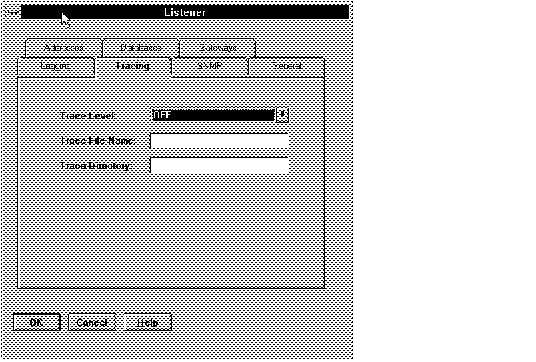 Figure 5 - 27. Listener Tracing Page
Tracing Level
Use this field to turn tracing on to the USER or ADMIN level and to turn it off. The default is off. For more information about tracing, see the Oracle Network Products Troubleshooting Guide.
Trace File Name
Use this field only if you want to name the listener trace file something other than the platform-specific default.
Attention: Although on many systems the error log file is named with the .TRC suffix, do not include the .TRC suffix when you enter the name of the log file. The Network Manager appends the suffix automatically.
Trace File Directory
Use this field only if you want to place the listener trace file somewhere other than its platform-specific default location.
Listener SNMP Page
Select this folder tab if you want this listener to be monitored using Oracle SNMP Support. You can enter parameters on this page to control the listener subagent that is used if Oracle SNMP Support is desired. The SNMP page is similar to the SNMP page for the Interchange. Refer to page 5 - 21.
For further information about using SNMP in your Oracle network, see the Oracle SNMP Support Reference Guide and Oracle operating system-specific documentation for your platform.
Close the Listener Property Sheet
When you are satisfied with the information in the fields, press OK to modify the network definition and close the property sheet. The name of the listener you entered will appear in the right column of the component property sheet menu. If you decide not to keep your entries, press Cancel to close the property sheet without modifying the network definition.
Note: The entries in any window that is the "child" of another window are lost when the "parent" window entries are canceled. Therefore, if you enter addresses, a database, or information about prespawned shadows in sub-windows of the Listener property sheet, all this information is eliminated if you select Cancel on the Listener property sheet.
Repeat this procedure to create the other listeners on the network.
Note: Refer to Appendix B for an example of a completed property sheet for a listener and its configuration files generated by the Network Manager.
Oracle Database
This property sheet is identical to the database property sheet shown in Figure 5 - 18, which is used in conjunction with the listener property sheet. If you define a database from this property sheet, you must also define a listener.
Attention: You can choose to define a database using this database property sheet instead of accessing the database window through the listener property sheet. However, if you have already defined the database through the listener property sheet, you do not need to use this database property sheet. If you do so, you will create redundant information, which the Network Manager will not accept.
Note: Refer to Appendix A for an example of a completed property sheet for a database and the configuration files generated by the Network Manager.
Note: Network Manager supports up to 50 databases per node.
Rdb Database
Use this property sheet if your network includes an Oracle Rdb database. You can access it from the Create menu or the Network Object Tool Bar. A page like that displayed in Figure 5 - 28 appears.
Rdb Database: General Page
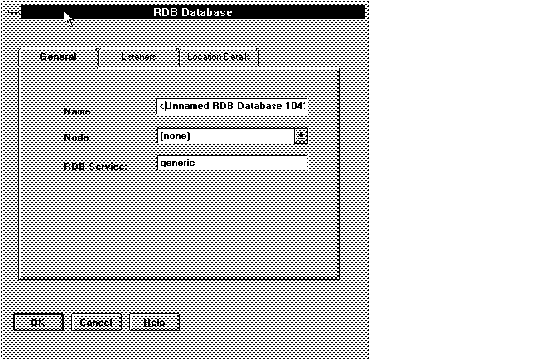 Figure 5 - 28. Rdb Database General Page
Name
Enter a service name for the Rdb database.
Node
Select the node the database is on from the drop-down list. If there is only one node on the network, that node appears in the text box by default.
Enter the Rdb SQL/Services name in this field. The default is "generic," but the database administrator may define other services. The Rdb SQL/Services Service name can have up to 31 characters, including alphanumeric, -, and -.
When you have completed this page, select the folder tab to display the Listeners page.
RDB Database: Listeners Page
The Listeners page for the RDB Database looks like that shown in Figure 5 - 29.
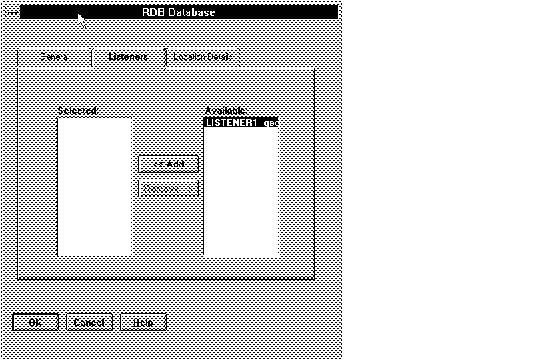 Figure 5 - 29. Rdb Database: Listeners Page
All available listeners appear in the list box on the left. Select the listeners for the Rdb database and select Add to move it to the Selected list. To remove a listener from the selected list, select it and select Remove.
An Rdb database can have multiple listeners.
When one or more listeners have been selected, select the Location Details folder tab to display the page shown in Figure 5 - 30.
Note: Listeners can listen for only one type of service. An Rdb listener cannot be associated with an Oracle database listener; conversely, an Oracle database listener cannot be associated with an Rdb database.
Rdb Database: Location Details Page
This page is the same as the Location Details page for an Oracle database.
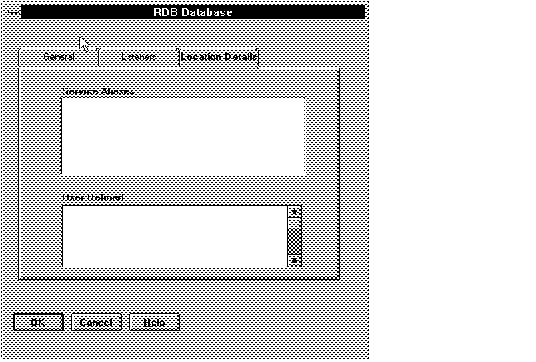 Figure 5 - 30. Rdb Database Location Details Page
Service Aliases
This field is read-only; it displays a list of any aliases that have been created for this RDB database. If you want to create aliases (alternative service names) for this database, use the Aliases property sheet.
The User Defined text box can be used to enter certain optional parameters that Oracle Network Manager does not otherwise include. For example, if you want to change the default buffer size of a database, you can do so by entering the following parameter and value into this text box:
(SDU = number)
The number can be anything from one to eight kilobytes, but may be limited by the transport protocol. The default is two kilobytes (2048).
Attention: The parameter and value must be enclosed in parentheses. Your entry will appear as you entered it as part of the description of the database in both the LISTENER.ORA file and the TNSNAMES.ORA file.
Close the Rdb Property Sheet
When you are satisfied with the information in the fields, press OK to modify the network definition and close the property sheet. The name of the Rdb database you entered will appear in the right column of the component property sheet menu. If you decide not to keep your entries, press Cancel to close the property sheet without modifying the network definition.
Oracle Gateway
Use this property sheet if your network includes an Oracle Gateway to a non-Oracle database. You can access it from the Create menu, the Network Object Tool Bar, or from a folder tab in the Listener property sheet. If you access it from the listener, a page like that shown in Figure 5 - 31 is displayed.
 Figure 5 - 31. Listener to Gateway Page
When you select Create, a property sheet like the one shown in Figure 5 - 32 appears.
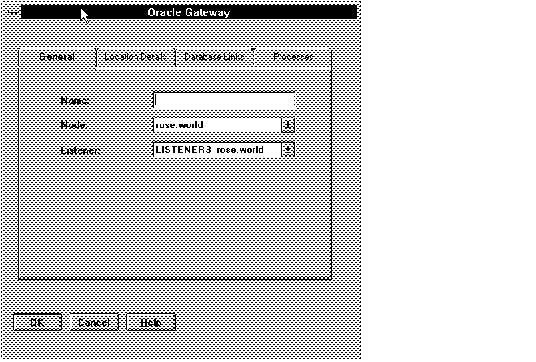 Figure 5 - 32. Gateway General Page
Gateway General Page
Name
Enter a name for the Oracle Gateway in this text field. The name of the Gateway can be any length. A value in this field is mandatory.
Node
Select the node the Gateway is on from the drop-down list. If you reached this property sheet through the listener, the listener's node is already in this field.
Listener
Select the listener for the Gateway from the drop-down list. If you reached this property sheet through the listener, the listener's name is already in this field.
Select the Location Details folder tab to continue defining the Gateway.
Location Details Page (Required)
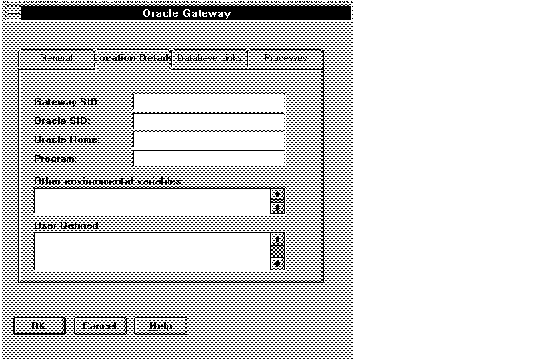 Figure 5 - 33. Gateway Location Details
GATEWAY_SID
Enter the system ID of the Gateway in this text box. It cannot be more than 8 characters. A value in this field is mandatory.
ORACLE_SID
Enter the system ID of the local Oracle database, if any, in this text box. It should match the Gateway SID and cannot be more than 8 characters.
Note: File-based gateways require a supporting database. If the supporting database is on the same machine as the Gateway, enter the database's ORACLE_SID. If the supporting database is on a remote machine, leave this field blank and use the "supporting_db" parameter in the Gateway initialization file.
ORACLE_HOME
Enter the value of the operating system-specific parameter used to set up the environment of the database. A value in this field is mandatory.
Program
Enter the full path to the PROGRAM executable. A value in this field is mandatory.
Note: The executable in Program must have the full path name or the PATH environment variable must be set in the "Other environmental variables" field immediately below it.
Other environment variables
This text field can be used to set any other environment variables. If you did not include the full path to the executable in the Program text field, set it here.
User Defined Parameters
Some operating systems require additional user defined parameters. If your system is one of these, enter them in this field; otherwise ignore it. See the operating system-specific documentation for your platform for further information.
Processes
Select this folder tab if you want to define prespawned processes for the Gateway. The purpose of the prespawned processes option is to reduce connect time by eliminating the need to spawn a process for each new connection request. A window like that in Figure 5 - 34 appears.
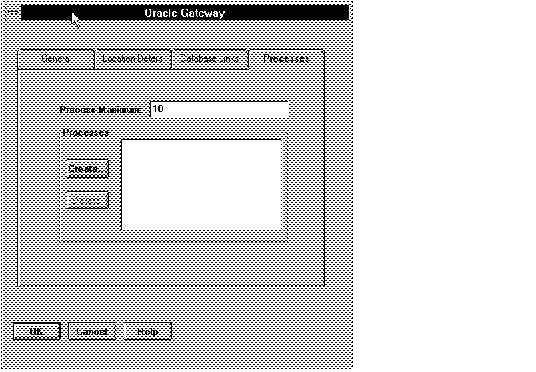 Figure 5 - 34. Gateway Prespawned Process Page
In this page provide the following information:
Process Maximum
The maximum number of prespawned processes the listener will create. This number must be at least as many as the sum of the maximum pool size for each protocol (see next page). For greatest efficiency, Oracle Corporation recommends a large value so that prespawned processes are always available for new connection requests. The default is 10.
Processes
To define processes further, press the Create button. The Dedicated Server page appears. This page, which is the same as that used for an Oracle database, is described in detail ![[*]](jump.gif) . Follow the instructions there to complete it.
. Follow the instructions there to complete it.
When you are satisfied with the information in the fields, press OK to accept your entries and close the window. You again see the Gateway Processes page. If you have finished defining the Gateway, press OK to accept your entries and close this window. If you want to provide information about database links to this Gateway, select the Database Links folder tab.
Database Links
With Oracle Names, a global database link is automatically created to each database from all others; the link name is the same as the service name of the database. Global database links are also created to databases accessed through Oracle Gateways. You can create multiple qualified links using the page shown in Figure 5 - 35.
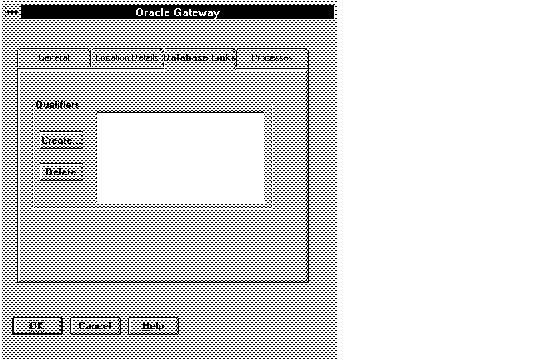 Figure 5 - 35. Gateway: Database Link Page
To create qualified database links, select Create. The Database Link page shown in Figure 5 - 36 appears.
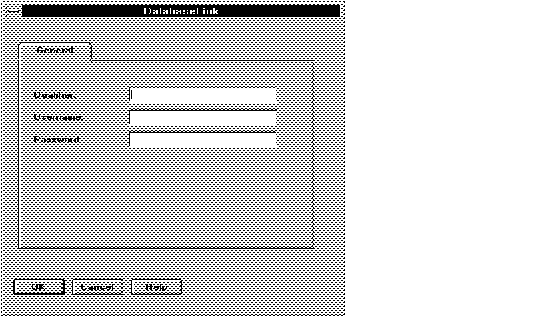 Figure 5 - 36. Database Link Page
On this page, provide information in the text fields as follows:
Qualifier
Enter a database link name
User Name
Enter a username (optional).
Password
Enter a password (optional).
When you are satisfied with your entries, press OK to accept them and return to the previous window. If you want to create more qualified database links, press Create again.
Note: For further information about database link qualifiers, see Oracle7 Server Distributed Systems, Volume I .
Close the Gateway Property Sheet
When you are satisfied with the information in the fields, press OK to modify the network definition and close the property sheet. The name of the Gateway you entered will appear in the right column of the component property sheet menu. If you decide not to keep your entries, press Cancel to close the property sheet without modifying the network definition.
NameServer
Use this property sheet, shown in Figure 5 - 37, only if you are using Oracle Names. This property sheet contains the control parameters for a Names Server. The control parameters are held in the database, and are retrieved by Oracle Names when it boots.
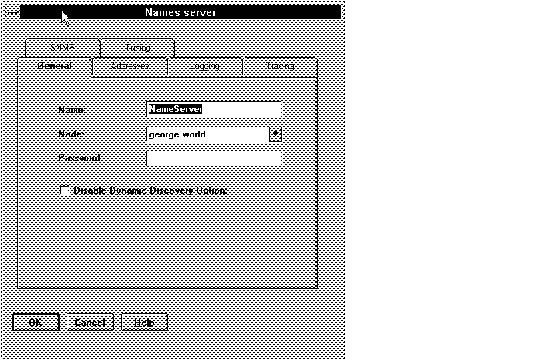 Figure 5 - 37. Names Server Property Sheet
Name
A default service name, NameServer, appears in this field. You may accept it or change it.
Note: If you have more than one Names Server in a domain, each must have a unique name.
Node
Select the node from the list box. Oracle recommends that if there is more than one community in the network, a Names Server should be placed on the same nodes as the MultiProtocol Interchange so that there is a Names Server available in every community.
Note: The node name that appears in this field is the most recently created or manipulated node; it is not necessarily the recommended node. (Only nodes that do not already have a Names Server appear on the list.)
Password
If you want to require a password of anyone who wishes to manipulate the Name server, enter it in this text box.
Disable Dynamic Discovery Option
Select this check box if you do not want this Names Server to use the Dynamic Discovery Option. The default is for the Dynamic Discovery Option to be on; it is important to select this checkbox if you do not want this Names Server to accept self-registrations from network services.
Note: Even if you do not select this check box, and thus leave the Dynamic Discovery Option on, the Names Server must be specially configured to act as a well-known Names Server in a Dynamic Discovery network. This configuration must be done manually. See Chapter 5 in the Oracle Names Administrator's Guide for further information.
Names Server: Tuning
Select this folder tab if you want to set timing parameters for the Names Server. The page shown in Figure 5 - 38 appears.
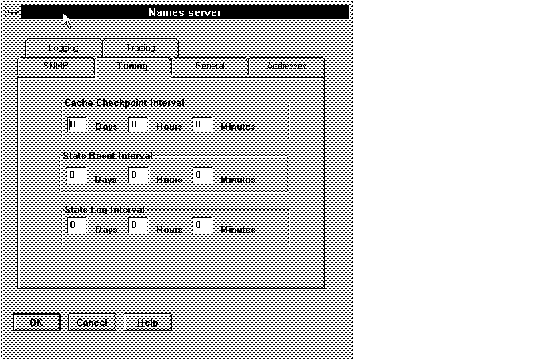 Figure 5 - 38. Names Server Tuning Page
Cache Checkpoint Int.
If you want the Names Server to write its data cache to a checkpoint file periodically, enter the interval in these fields. The default value of 0 means there is no checkpointing.
Stats Reset Interval
Enter the time during which the statistics collected by the Names Server should accumulate. At the interval specified, they are reset to zero. The default value of 0 means that statistics are never reset.
Stats Log Interval
Enter the time during which the statistics collected by the Names Server should be logged to a file. At the interval specified, they are written to a file. The default value of 0 means that statistics are never logged.
Names Server: Addresses
To enter an address for the Names Server, select the Addresses folder tab. On the Addresses page displayed, select Create and proceed as you did for the Interchange and Listener addresses. Once addresses are created, you can delete or demote them in the same way as you can the Interchange and Listener addresses.
Names Server: Logging
If you want to change any of the default logging parameters, select Logging. A page appears, similar to those you saw for the listener, containing the following fields:
Log File Name
Indicates the name of the output file to which Names Server operational events are written. Enter a filename in this field only if you want to override the platform-specific default. On most operating systems, the filename extension .LOG is automatically added to the end of the filename entered here; do not include a filename extension in your entry in this field.
Log File Directory
The directory in which the log files for the Names Server are placed. If this field is left blank, a platform-specific default will be used.
See the Oracle Names Administrator's Guide for further information about logging for the Names Servers.
When you have entered the information you wish, select another folder tab or select OK to accept and close the Names Server page.
Names Server: Tracing
Select this folder tab if you wish to change the default settings for tracing information for the Names Server. See the Oracle Network Products Troubleshooting Guide for details on initiating and using the tracing feature. The parameters are as follows:
Unique Trace File
If this check box is toggled to ON, the trace facility appends a process identifier to the name of each trace file generated, so that several trace files can coexist. If this check box is toggled to OFF, each trace file overwrites the preceding one. Because of the large size of trace files, this check box should generally be OFF.
Trace Level
Indicates the level at which the Names Server should be traced. This parameter is optional; the default is OFF. Other choices are USER and ADMIN.
Trace File
The name of the output file from a trace session for the Names Server. Enter a filename in this field only if you want to override the platform-specific default. If this field is left blank, a platform-specific default will be used.
Note: Although on many systems trace files are named with the .TRC suffix, do not include the .TRC suffix when you enter the name of the trace file here. The Network Manager appends the suffix automatically.
Trace Directory
Indicates the location to which any Names Server trace file will be generated. If this field is left blank, a platform-specific default will be used.
See the Oracle Names Administrator's Guide for further information about tracing for the Names Servers.
When you have entered the information you wish, select another folder tab or select OK to accept and close the Names Server page.
Names Server: SNMP Page
Select this folder tab if you want to have this Names Server monitored using Oracle SNMP Support. You can enter parameters to control the Names Server subagent that is used if Oracle SNMP Support is desired. The screen that appears looks like that shown in Figure 5 - 39.
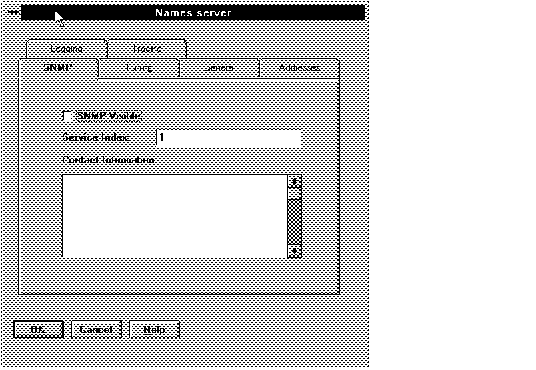 Figure 5 - 39. Names Server SNMP Page
The parameters are as follows:
SNMP Visible Select this button to make this Names Server visible to the Master Agent (that is, to enable Oracle SNMP Support).
Service Index
Provide an SNMP Index that is a unique identifier of this service on this node. Network Manager generates one automatically, but you can change it if you wish. The Index can be any integer between 1 and 2147483647; enter it in this text box. If there is SNMP-manageable third party software (such as a mail or directory service) on this node, be sure that it does not have a duplicate SNMP Index.
SNMP Contact
Enter the name or other identifier of the person who administers this service. This contact information may be made available upon request to users or managers through SNMP. Oracle recommends that the contact information be limited to no more than 255 characters and that a phone number be included.
For further information about using SNMP in your Oracle network, see the Oracle SNMP Support Reference Guide and Oracle operating system-specific documentation for your platform.
Close the Names Server Property Sheet
When you are satisfied with all the information in the Names Server property sheet, press OK to create the Names Server and close the property sheet. The name of the Names Server you entered appears in the right column of the Tree View window. If you decide not to keep your entries, press Cancel to close the property sheet without creating a Names Server.
Repeat this procedure to create all the Names Servers in the network.
Client Profile
Client profiles are created automatically by the Network Manager. For every community created and for every node that is a member of more than one community, the Network Manager creates a client profile. The Client Profile property sheet, shown in Figure 5 - 40, enables you to edit the characteristics of the automatically created client profiles and allows you to create your own, if required. Client profiles describe groups of clients with the same default domain and similar navigation requirements in multi-community networks. (These groups of clients are also referred to as client types.) If you want to edit a client profile, select the name of the client profile in the Tree View Object List or the Map View window. Do not select Create unless you have reason to add extra client profiles.
Figure 5 - 40 shows the client profile automatically created by the Network Manager for clients in a community named TCPCOM.WORLD.
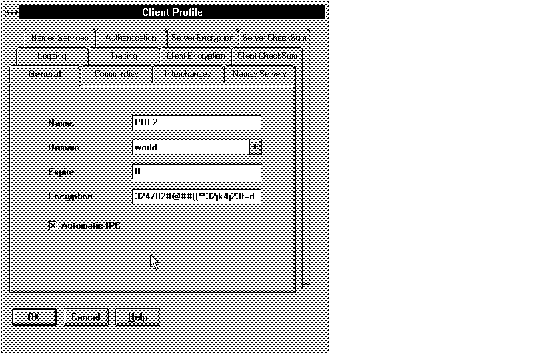 Figure 5 - 40. Client Profile Property Sheet
Name
The names the Network Manager creates for client profiles are the same as the names of the communities of which they are members; client profiles based on multi-community nodes are given names that reflect their multiple communities. You can change them if you wish.
Domain
The default domain is the domain to which the majority of the clients' connection requests are directed. The service names of databases in the default domain do not need to be fully qualified; that is, the domain name does not need to be included in a connection request. Select the default domain from the drop-down list. The list contains only local domains.
Note: The default domain is not necessarily the same as the domain of the clients themselves. For example, clients in one domain may frequently access Oracle servers in another domain.
Expire Time
Expire time is the amount of time in minutes the connection can be idle before it is terminated by the system if a client or server is abnormally terminated. If no value is entered in this field, the connection may be maintained indefinitely. The range of possible values is from one to a very large number. However, a value of approximately 10 is recommended.
Encryption Seed
This field is important if you are using the encryption services of Oracle Advanced Networking Option (formerly known as Secure Network Services) in your network. A randomly generated number appears by default in this text box. You are not required to change it, but Oracle Corporation recommends that you do so, by entering a random string of at least 16 miscellaneous characters.
If you are not using Oracle Advanced Networking Option (ANO), ignore this field.
Automatic IPC
Use this button to control whether connection requests automatically look for an IPC address before looking for a network address. The default is for the button to be selected, which means that an IPC address is used if it is available. Select this button to toggle it to turn IPC addresses off. Note that there is a performance advantage if Automatic IPC is off on machines that do not have databases on them.
Communities Page
The communities that are included in the client profile appear in the Selected list automatically. You may add to the Selected list by selecting other communities from the Available list and selecting Add. You may delete a community from the Selected list by selecting it and selecting Remove. See Figure 5 - 41.
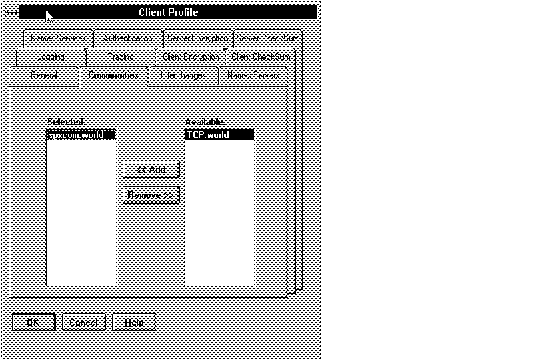 Figure 5 - 41. Client Profile: Communities Page
Client Profile: Interchanges Page
Use this page to choose the preferred Interchange for the client profile. All the Interchanges that have addresses in the client's community appear in the Selected column. If there are two or more, the order in which they appear determines which Interchange will be the first one contacted for an inter-community connection request. The Interchange page looks similar to that in Figure 5 - 42.
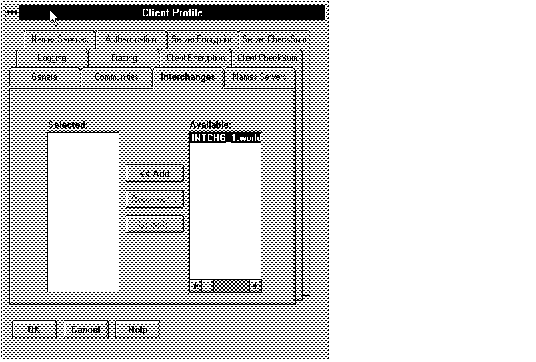 Figure 5 - 42. Client Profile: Interchange Page
To lower the priority of an Interchange, select it and press Demote. You can add to the list by selecting the Link button, selecting from the list of available Interchanges, and pressing Add. You can remove an Interchange from the list by selecting it and pressing Remove.
Client Profile: Names Servers Page
Use this page to choose the preferred Names Server for the client profile. All the Names Servers that have addresses in the client's community appear in the Selected column. If there are two or more, the order in which they appear determines which Names Server will be the first one contacted. The Names Server page looks similar to the Interchange page; see Figure 5 - 42.
Client Profile: Logging Page
Select this folder tab to enter optional parameters about client logging. The page is similar to the Logging page for the listener. It contains the following fields:
Log File
Use this field only if you want to name the client log file something other than the platform-specific default.
Note: Although on many systems the error log file is named with the .LOG suffix, do not include the .LOG suffix when you enter the name of the log file. The Network Manager appends the suffix automatically.
Log Directory
Use this field only if you want to place the client log file somewhere other than its platform-specific default location.
Client Profile: Tracing Page
Select this folder tab to control optional tracing parameters for the clients with this client profile. For more information about tracing, see the Oracle Network Products Troubleshooting Guide. The tracing page is shown in Figure 5 - 43.
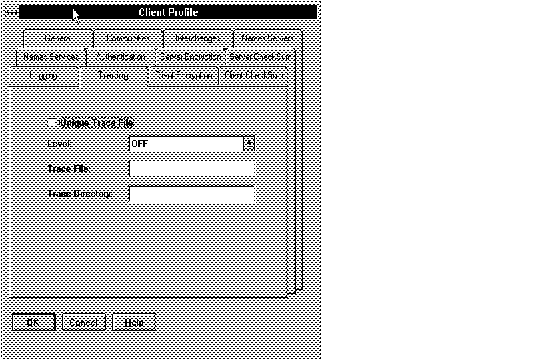 Figure 5 - 43. Client Profile: Tracing Page
It includes the following fields:
Unique Trace File
Select this check box if you want the trace utility to add a process identifier to each trace file. A process identifier as part of the file name allows multiple trace files to coexist. Otherwise, a later trace file overwrites an earlier one.
Note: Trace files can be very large, so be sure to delete old trace files when they are no longer needed, and keep trace turned to OFF except for specific troubleshooting tasks.
Level
Use this field to turn tracing on to the USER or ADMIN level and to turn it OFF. The default is OFF.
Trace File
Use this field only if you want to name the client trace file something other than the platform-specific default.
Note: Although on many systems trace files are named with the .TRC suffix, do not include the .TRC suffix when you enter the name of the trace file here. The Network Manager appends the suffix automatically.
Trace Directory
Use this field only if you want to place the listener trace file somewhere other than its platform-specific default location.
Client Profile: Client Encryption Page
Select this folder tab to enable security services on the clients in this client profile.
Note: To enable Secure Network Services, you must also use the Server Encryption page.
Attention: Note that these security services are part of Oracle Advanced Networking Option (ANO). ANO is a separate, unbundled product that must be purchased separately from SQL*Net. Machines with these secure services must be configured differently than those without them. If a machine without security services installed were to be configured incorrectly with the encryption parameter set to the value REQUIRED, it would be unable to meet this requirement, and all connections would therefore fail.
A page like that in Figure 5 - 44 appears.
 Figure 5 - 44. Client Profile: Client Encryption Page
The encryption parameters are as follows:
Level
Scroll through the drop-down list and select the level of encryption the client requires. Choices are Accepted, Rejected, Requested, and Required.
Selected
Select the desired encryption type from the Available column and press Add to move it to the Selected column. Choices are DES, DES40, RC4_40, RC4_56, and RC4_128.
For information about Oracle Advanced Networking Option and the meaning of these parameters, see the Oracle Advanced Networking Option Administrator's Guide.
Client Profile: Client Checksum Page
Choose this folder tab to define optional checksum parameters for the clients if you are using ANO. The page is similar to the client encryption page.
Level
Scroll through the drop-down list and select the requirement the clients have for checksumming. Choices are Accepted, Rejected, Requested, and Required.
Selected
Select the desired checksum type from the Available column and select Add to move it to the Selected column. The only choice is MD5.
For information about Oracle Advanced Networking Option and the meaning of these parameters, see the Oracle Advanced Networking Option Administrator's Guide.
Client Profile: Server Encryption Page
Select this folder tab to enable Oracle Advanced Networking Option on the Servers in this client profile. This page is similar to the Client Encryption page (Figure 5 - 44).
Note: To enable Oracle Advanced Networking Option, you must also use the Client Encryption page.
Attention: Note that Oracle Advanced Networking Option is a separate, unbundled product, and that machines with ANO must be configured differently than those without it. If a machine without ANO installed were to be configured incorrectly with the encryption parameter set to the value REQUIRED, it would be unable to meet this requirement, and all connections would therefore fail.
The encryption parameters are as follows:
Level
Scroll through the drop-down list and select what level of encryption the server requires. Choices are Accepted, Rejected, Requested, and Required.
Type
Select the desired encryption type from the Available column and select Add to move it to the Selected column. Choices are DES, DES40, RC4_40 and RC4_56, RC4_128.
If there were two or more types selected, you could determine the priority of the encryption types by using the Demote button. The encryption type at the top of the Selected list is tried first; the next, second; and so forth.
For information about Oracle Advanced Networking Option and the meaning of these parameters, see the Oracle Advanced Networking Option Administrator's Guide.
Client Profile: Server Checksum Page
Choose this folder tab to define optional checksum parameters for the server if you are using Oracle Advanced Networking Option. The page is similar to the Client Checksum page.
Level
Scroll through the drop-down list and select what requirement the clients have for checksumming. Choices are Accepted, Rejected, Requested, and Required.
Type
Select the desired checksum type from the Available column and select Add to move it to the Selected column. The only choice is MD5.
If there were two or more types selected, you could determine the priority of the checksum types by using the Demote button.
For information about ANO and the meaning of these parameters, see the Oracle Advanced Networking Option Administrator's Guide..
Client Profile: Authentication Page
Select this folder tab to configure an authentication service on your network. When you select Authentication, the initial Authentication page shown in Figure 5 - 45 appears.
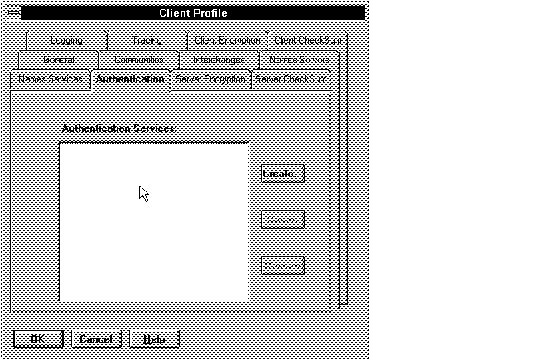 Figure 5 - 45. Client Profile: Initial Authentication Page
To configure one or more authentication adapters to be used, select Create to bring up the default Authentication Services page shown in Figure 5 - 46.
Client Profile: Authentication Services Page
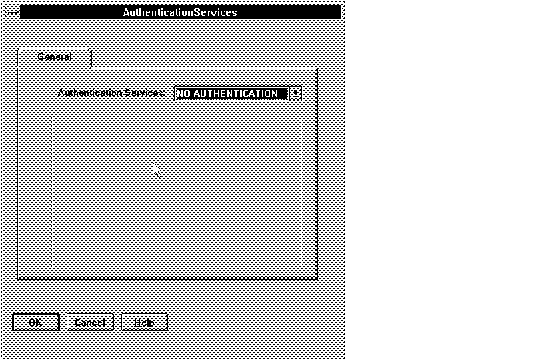 Figure 5 - 46. Default Authentication Services Page
The default authentication page calls for NO AUTHENTICATION. There are no additional parameters needed if NO AUTHENTICATION is selected. Accept this choice, by selecting OK, if you do not want authentication. Otherwise, select an authentication adapter from the drop-down list.
Note: If you want to disable authentication, you only need to select No Authentication in the Client Profile for the client--not the server.
Note: No Authentication must be selected uniquely. If you select No Authentication in addition to any other Authentication Services or All, Network Manager will warn you to change your selection.
If you want to specify one or more authentication services to be used in a specific order, select one of the authentication services from the drop down list at the top of the page. Besides NO AUTHENTICATION, choices are: Access Manager, CyberSAFE, Identix, Kerberos (V5), and SecurID.
Attention: Do not select an authentication service unless it is installed and linked into your SQL*Net network. If you do, it will cause connections to fail because they will look for authentication where none is available.
Parameters
Some of the authentication adapters have parameters for which you may need to supply values. The parameters appear in the middle of each authentication service's page. If you use the default choice of NO AUTHENTICATION, there are no parameters required.
For further information about authentication parameters and their possible values, see the Secure Network Services Administrator's Guide.
Client Profile: Access Manager Authentication Page
If you select Access Manager on the default Authentication page, the Access Manager page shown in Figure 5 - 47 displays.
There is only one parameter for Access Manager, for which you must provide a value. There is no default. An example of a possible entry is oracle/dbserver.someco.com@SOMECO.COM.
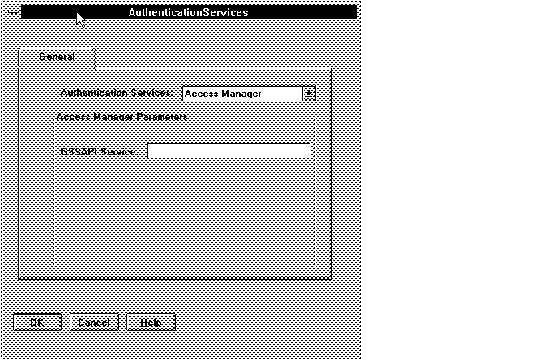 Figure 5 - 47. Access Manager Authentication Page
Attention: You can select CyberSAFE or Access Manager, but not both at the same time.
If you select CyberSAFE on the default Authentication page, the CyberSAFE page shown in Figure 5 - 48 displays.
GSSAPI Service
There is only one parameter for CyberSAFE, for which you must provide a value. An example of a possible entry is oracle/dbserver.someco.com@SOMECO.COM. You must provide a value for this parameter, or authentication will not function.
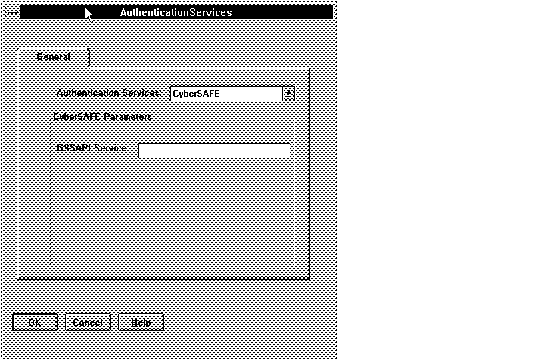 Figure 5 - 48. CyberSAFE Authentication Page
Attention: You can select CyberSAFE or Access Manager, but not both at the same time.
Client Profile: Identix Authentication Page
If you select Identix on the default Authentication page, the Identix page shown in Figure 5 - 49 displays.
Note: The Identix authentication service will be available in the Secure Network Services 2.1 Production release. Do not select Identix until it has been installed on your system.
Database Directory
There is only one parameter for which you must provide a value. There is no default.
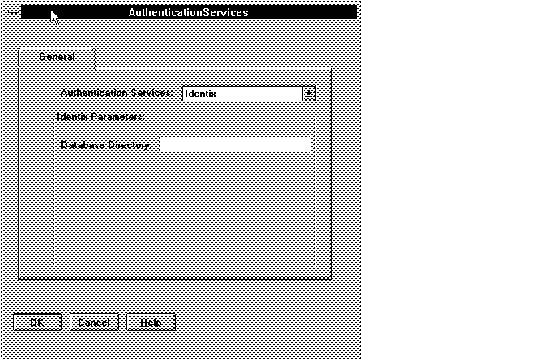 Figure 5 - 49. Identix Authentication Page
Client Profile: Kerberos Authentication Page
If you select Kerberos (V5) on the default Authentication page, the Kerberos (V5) page shown in Figure 5 - 50 displays.
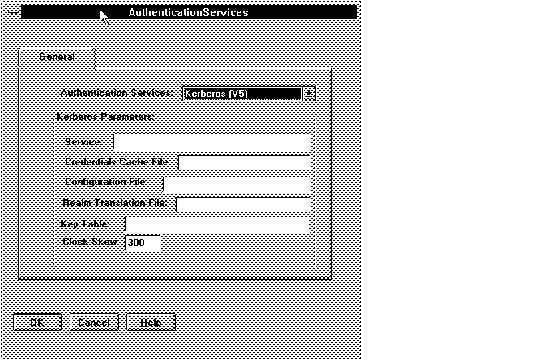 Figure 5 - 50. Kerberos Authentication Page
Service
This required parameter specifies the name of the service Oracle will use to obtain a Kerberos service ticket. There is no default--you must define one. Refer to the Kerberos chapter in the Oracle Advanced Networking Option Administrator's Guide. for more information.
This optional parameter specifies the complete pathname to the Kerberos credentials cache file. The default value is operating system-dependent. For Sun OS, it is /tmp/krb5cc_uid.
This parameter specifies the complete pathname to the Kerberos configuration file. The configuration file contains the realm for the default KDC (key distribution center) and maps the realms to KDC hosts.
The parameter specifies the complete pathname to the Kerberos realm translation file. The translation file provides mapping from a host name or domain name to a realm. The default is operating-system dependent. For example, on UNIX OS, it is /krb5/krb.realms.
This parameter specifies the complete pathname to the Kerberos principal/secret key mapping file. It is used by the Oracle server to extract its key and decrypt the incoming authentication information from the client. The default is operating system-dependent. For Sun OS, it is /etc/v5srvtab.
This parameter specifies how many seconds can pass before a Kerberos credential is considered out-of-date. It is used when a credential is actually received by either a client or a server. It is also used by an Oracle server to decide if a credential needs to be stored to protect against a replay attack. The default is 300 seconds.
Client Profile: SecurID Authentication Page
If you select SecurID on the default Authentication page, the SecurID page shown in Figure 5 - 51 displays.
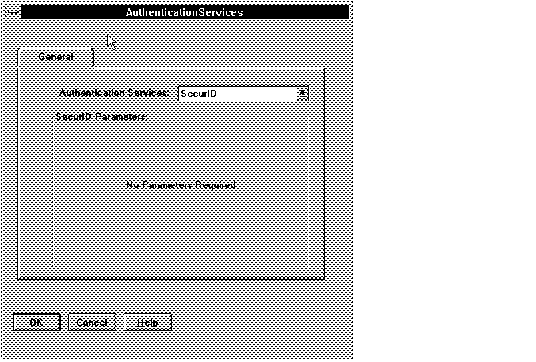 Figure 5 - 51. SecurID Authentication Page
There are no parameters necessary for the SecurID authentication service. To enable the SecurID authentication service, select SecurID on the Default Authentication Services Page. You do not need to open this authentication page to enable SecurID.
Client Profile: Naming Services Page
Select this folder tab if you want to use native naming services on your network. If you wish to use the default SQL*Net address lookup method using the TNSNAMES.ORA file, do not select this page. If you are using Oracle Names, this page is optional.
When you select Names Services, the page shown in Figure 5 - 52 appears.
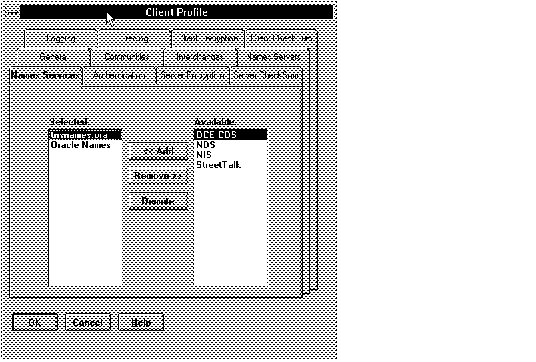 Figure 5 - 52. Client Profile: Naming Services Page
Select one of the naming services that appear in the Available list and select Add to move it to the Selected column. By default names resolution by TNSNAMES.ORA and Oracle Names are selected.
Note: Oracle Names, DCE (CDS), NDS, and NIS are available now; StreetTalk will follow.
Attention: Do not select a native naming service unless it is installed in your network. If you do, it will not function. Furthermore, its selection will disable the default method of identifying network services and their addresses (through a TNSNAMES.ORA file or Oracle Names).
You can manipulate the order in which naming services are used by selecting them and moving them using the Demote button. The order in which the services appear in the Selected list is the order in which they will be used by the client. For example, if DCE CDS is the first naming service in the Selected list, and TNSNAMES.ORA is the second, then the client's connection requests will be resolved by CDS. If for some reason CDS is unavailable, the request will be resolved by the TNSNAMES.ORA file.
Although Oracle Names is selected by default as the second method for resolving names to addresses, to use Oracle Names, you must do the following:
- Save your network definition to a database.
- Use the property sheets to configure Names Servers.
- Generate your files to a file system and Oracle Names.
When you are satisfied with the information in the fields, press OK to add these name services to your network and to return to the Client Profile property sheet.
Close the Client Profile Property Sheet
When you are satisfied with your entries to the Client Profile property sheet, select OK to keep your changes and close the property sheet. If you decide not to keep your entries, select Cancel to close the property sheet without keeping your changes.
Repeat this procedure to edit other client profiles as needed.
Note: Refer to Appendix A for an example of a default property sheet for a client profile created by Network Manager, and the configuration files generated from it. Refer to Appendix B for an example of a client profile that has been edited to include security parameters and the configuration files generated from it.
Alias
Use this property sheet, shown in Figure 5 - 53, to define alternative service names for databases or database links in your network. The aliases you define appear in the TNSNAMES.ORA file. If you are using Oracle Names, you can define aliases for both local and remote databases, that is, databases in the local region or foreign regions. The aliases are stored in the network definition used by Oracle Names.
There are a number of reasons you might want to create an alias:
- to provide an alternate name for a database that is easier to use or remember than the service name. If the database is in a domain other than the default domain, creating an alias can enable you to access the database without using the full global name.
- to assign the connection request to a dedicated server (Options page)
- to assign a single name for multiple equivalent databases. If two databases have virtually identical information (as in replicated databases), assigning a single alias to both service names enables load balancing between them.
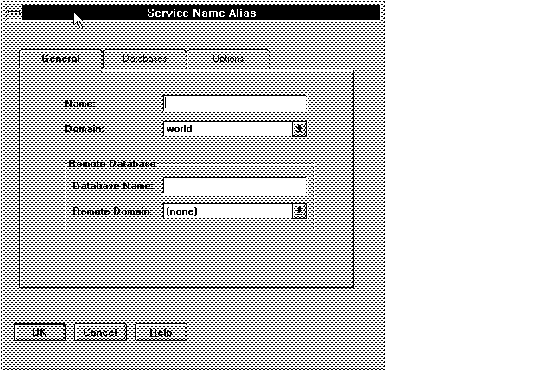 Figure 5 - 53. Alias Property Sheet
Name
Enter an alternative service name for the database or database link.
Domain
If there is more than one in your network, select the appropriate domain.
If Remote Database, select:
Database Name Enter the service name of the database or database link for which you want an alias.
Remote Domain
Select the remote domain from the drop-down list that appears.
Alias Databases Page (Required)
On this page, select one or more database service names for which the alias acts.
Note: Choose more than one database only if the databases are eqhivalent.
Alias Options Page (Optional)
Use this page to set the optional parameter for the alias. A page like that shown in Figure 5 - 54 appears.
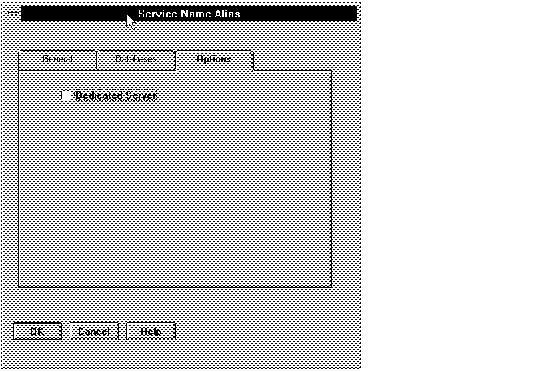 Figure 5 - 54. Alias Options Page
Dedicated Server
Select this check box to force the alias to use a dedicated server process rather than a multi-threaded server.
Complete and Close the Alias Property Sheet
When you are satisfied with the information in this property sheet, press OK to create the alias and close the property sheet. If you decide not to keep your entries, press Cancel to close the property sheet without creating an alias.
Repeat this procedure to define other aliases in the network.
Example of a Useful Alias
In Figure 5 - 55, the alias CASH is created in the WEST.ACME domain for the local database FINANCE.EAST.ACME.
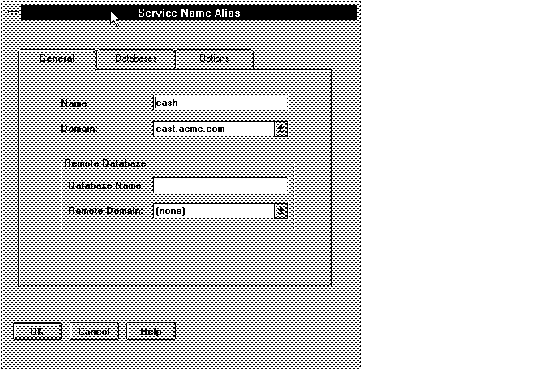 Figure 5 - 55. Example of a Service Name Alias
Because the alias is created in a different domain than the domain of the service name, there are two ways clients can contact the database without including the domain name:
- Clients whose default domain is EAST.ACME can use the service name FINANCE.
- Clients whose default domain is WEST.ACME can use the service name alias CASH.
V1Connect
Use the property sheet shown in Figure 5 - 56 if you wish to map a SQL*Net V1 connect string to a service name in the TNSNAMES.ORA file or in the Names database. When you do this, the service name you enter acts as an alias for the SQL*Net V1 connect string, making it easy to access a server in a network that still uses SQL*Net V1.
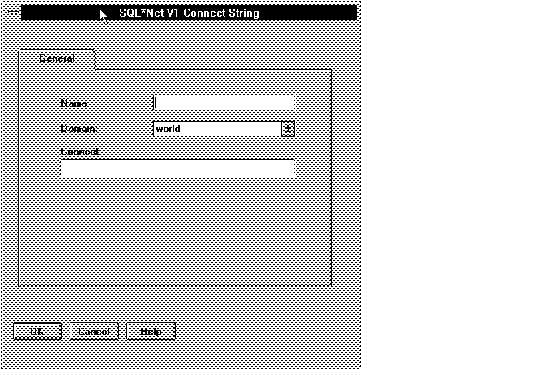 Figure 5 - 56. V1Connect Property Sheet
Name
Enter a service name for the connect string.
Domain
Select a domain from the drop-down list.
Connect String
Enter the SQL*Net V1 connect string.
Close the V1 Connect Property Sheet
When you are satisfied with the information in this property sheet, press OK to put the V1 connect string mapping into the network definition and close the property sheet. If you decide not to keep your entries, press Cancel to close the property sheet without placing the V1 connect string mapping in the network definition.
Importing a File of V1 Connect Strings
If you have a file in which V1 connect strings are already mapped to aliases or service names, you may import the entire file using Import V1 Connect Strings from the Special menu on the Oracle Network Manager window.
Select Import V1 Connect Strings to bring up the Open File window. The window is similar in function to the Save and Generate windows. Select the path and name of the V1 connect string file, then press OK. The V1 connect strings will be included in the network definition.
Note: SQL*Net V1 connect strings are imported into the World domain. If you want them in a different domain, you must first import them, then edit the domain in the property sheet of each connect string.
Use the property sheet shown in Figure 5 - 57 to configure the Oracle Enterprise Manager Agent. The Oracle Enterprise Manager Agent acts as a front end between the Oracle Enterprise Manager console and the objects it affects (generally Oracle7 Servers). Oracle Enterprise Manager requires an agent on every node that has one or more Oracle databases.
General Page
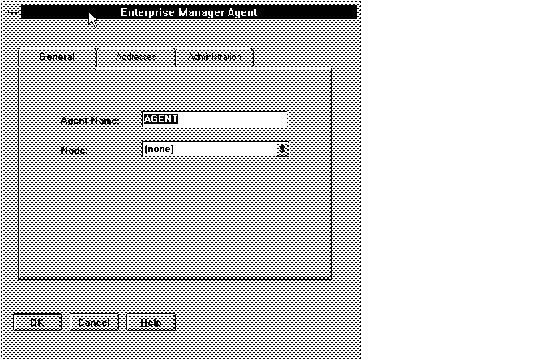 Figure 5 - 57. Oracle Enterprise Manager Agent General Page
Note: Oracle Enterprise Manager must be installed and active for the Agent to be effective.
Agent Name
Enter a name for the agent. The default is Agent.
Node
Select the node on which the agent resides from the drop-down list. You should have an agent on each node that has an Oracle database.
Enterprise Manager Agent: Addresses
To enter an address for the Oracle Enterprise Manager Agent, select the Addresses folder tab. On the Addresses page displayed, select Create and proceed as you did for the Interchange, listener, or Names Server addresses. Once addresses are created, you can delete or demote them in the same way as you could the Interchange and listener addresses.
You must assign two addresses to the Agent.
- The first address is the address of the agent itself. This address appears in the SNMP.ORA file.
- The second address is the address for the DBSNMP = SPAWN parameter in the SNMP.ORA file.
You can create these addresses easily by selecting the Create button three times. For some protocols, such as TCP, Network Manager creates new addresses automatically that require no editing. For other protocols, such as SPX, you may need to edit the automatically created addresses to differentiate them.
Attention: You must create two addresses. If you do not, Network Manager will warn you of an error, and will not generate configuration files.
Enterprise Manager Agent: Administration
Select the Administration folder tab to display a page in which you can define some administrative parameters of the Agent. The page is shown in Figure 5 - 58. These parameters appear in the SNMP.ORA file.
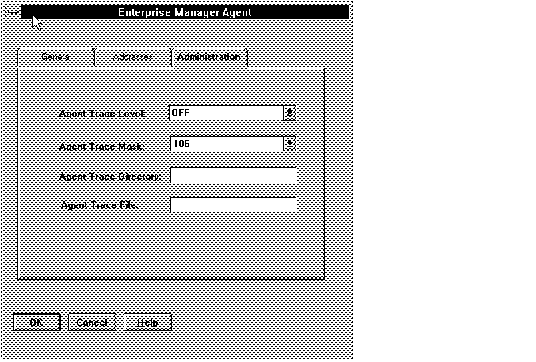 Figure 5 - 58. Oracle Enterprise Manager Agent Administration Page
Trace Level
Choices are OFF, USER, and ADMIN. The default is OFF.
Agent Trace Mask
If you want to see trace information only about the Agent, set the Trace Mask to 106. Otherwise, set to NONE.
Agent Trace Directory
Use this field only if you want to place the agent trace file somewhere other than its platform-specific default location.
Agent Trace File
Use this field only if you want to name the agent trace file something other than the platform-specific default. The default trace file name is DBSNMP_pid.TRC, where pid is a process identifier to make each trace file name unique.
Note: Although on many systems trace files are named with the .TRC suffix, do not include the .TRC suffix when you enter the name of the trace file here. Network Manager appends the suffix automatically.
For more information about the Oracle Enterprise Manager Agent, see the Oracle Enterprise Manager Application Developer's Guide.
Oracle Trace
Use the Oracle Trace property sheet, shown in Figure 5 - 59, to configure Oracle Trace on your network. Oracle Trace, which will be available in Production status in fall of 1996, provides enhanced tracing functionality to improve your ability to troubleshoot network problems. For detailed information about the functionality of Oracle Trace, see the Oracle Trace documentation.
Oracle Trace is accessed through Oracle Enterprise Manager. Therefore, to use Oracle Trace you also need to configure OEM Agents on all the nodes on which you will use Oracle Trace.
Note: Do not attempt to configure Oracle Trace in your network until the product is in production status and until you have read its documentation.
Note: Oracle Trace requires a listener on each node. The listener must not be configured to listen for a database. Using the Listener property sheet, create the Oracle Trace listeners on each node before configuring Oracle Trace.
Use this property sheet to configure the Oracle Trace on every client and server that will use it.
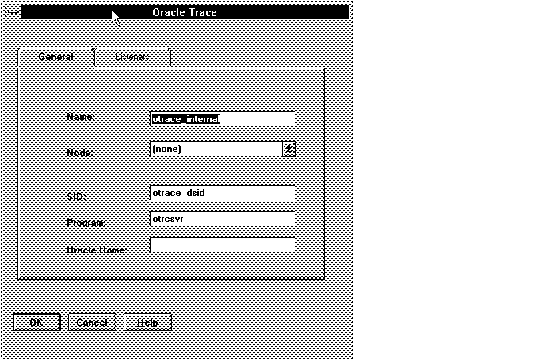 Figure 5 - 59. Oracle Trace Property Sheet: General Page
Name
The default name for an Oracle Trace client is otrace_internal. You may change it if you wish.
Node
Select the node from the list in the drop-down box.
SID
This field is read-only. It cannot be changed. The SID of the database for Oracle Trace must be otrace_dsid.
Program
This field is read-only. It cannot be changed. The Program must be otrcsrv.
Oracle Home
Enter the ORACLE_HOME for the Oracle Trace database.
To configure a listener for Oracle Trace, select the Listener page. A page like that shown in Figure 5 - 60 appears.
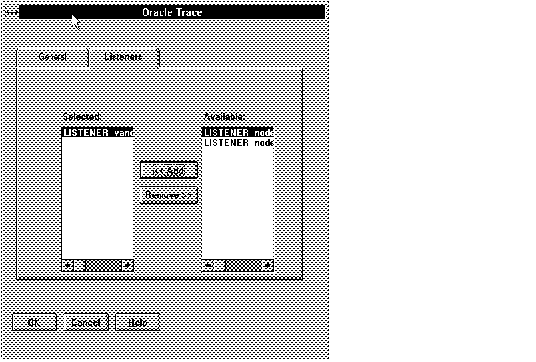 Figure 5 - 60. Listener Page for Oracle Trace
Select a listener that has not already been associated with a database from those in the Available list. A listener for Oracle Trace cannot listen for any other service.
Note: A listener without an associated database must already have been created from the Listener property sheet.
Local Region
You do not need to create a local region; Oracle Network Manager creates one automatically for a new network. However, you may wish to edit the existing local region. To do so, while in the Domain layout, select the Local Region icon in the Tree View Object List. The property sheet displayed looks like that shown in Figure 5 - 61.
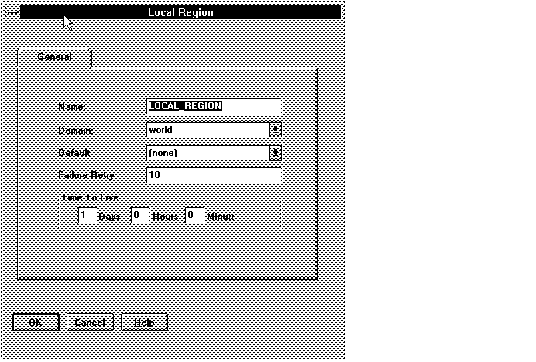 Figure 5 - 61. Local Region Property Sheet
Name
The default is LOCAL_REGION. You can change it if you wish.
Domain
Select one of the domains displayed in this drop-down list. The domain you choose will be appended to the name of the local region. The name of the region includes the domain name you select; for example, LOCAL_REGION.WEST.ACME.COM.
Default Forwarder
From this drop-down list, select the name of the Names Server you want to be primarily responsible for forwarding information and requesting information from foreign name servers.
Failure Retry Int.
This parameter indicates the frequency with which the Names Server will attempt to download the latest copy of data from the Network Manager network definition database, if the database is not immediately available. The default is 10 minutes.
This parameter indicates the length of time local data may be stored in a foreign name server. The default is one day.
When you are satisfied with the information in this property sheet, press OK to place the information about the Region into the network definition and close the property sheet. If you decide not to keep your entries, press Cancel to close the property sheet without accepting the changed information about the Region.
Close the Property Sheet
When you are satisfied with your edits, select OK to close the property sheet.
Foreign Region
To define foreign regions in the network, select Foreign Region from the Create menu. (You must be in Domain Layout.) The Foreign Region window that appears is shown in Figure 5 - 62.
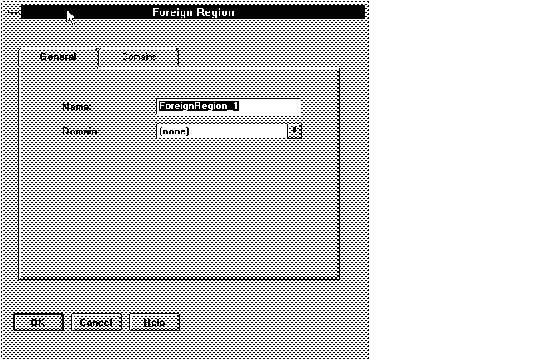 Figure 5 - 62. Foreign Region: General Page
Foreign Region: General Page
Name
The Network Manager creates names for foreign regions in the order in which you create them. If you wish, you can edit the names to be more meaningful and to be consistent with the names that other regions use.
Domain
From this drop-down list, choose the domain that you want to be appended to the name of the foreign region.
Foreign Region: Domains Page
On this page, shown in Figure 5 - 63, select all the domains that are part of this region. The Available list includes all the names of the domains you have marked as foreign and that you have not already 68
allocated to other foreign regions. Select all those that are part of this foreign region.
You can remove a domain from the Selected column by selecting it and selecting Remove.
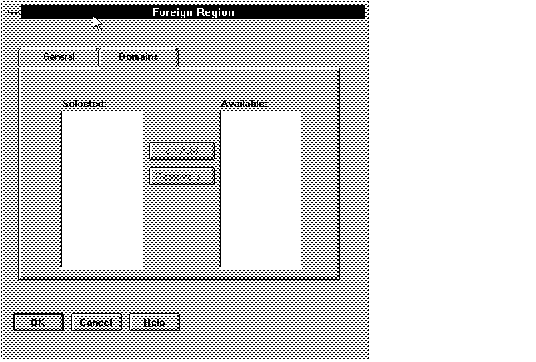 Figure 5 - 63. Foreign Region Domains Page