Engineering Run Tutorial
The purpose of these tutorials is to introduce you to ntuples and trees in root, as
well as to how these objects are filled using the engineering run signal processing
methods. The tutorials are available as a tar file, which you must download and untar.
In addition tutorial 4, gives an example of how to access from phat the
data base using SQL statements.
Getting Setup
- Ensure you have a running version of Phat on your machine.
If you want to run tutorial 4 ensure you have a phat that has the oracle libraries
connected.
- Ensure you have an ssh deamon running on your machine. (This allows you to ship files
from rcf to your machine)
- Copy the tutorial files to your machine, into a directory where you want to work. See Downloading the Tutorial files.
- Copy the pedestal and calibration files to your machine, into a directory where you want
them. See Downloading pedestal and
calibration files.
- Copy a data file to your machine.See Downloading Data
Files.
- You are now setup for tutorials.
Tutorial 1
- Tutorial 1a : Learning how to use ntuples and processed data
files in ROOT.
- Tutorial 1b : Learing how ntuples and processed data files in
tutorial 1a created in Phat.
Tutorial 1.5
- Tutorial1.5a : Learning how to make and view histograms and
ntuples from a ASCII file
Tutorial 2
Tutorial 3
- Tutorial 3: Learning how to examine contents of a raw data
file
Tutorial 4
- Tutorial 4: Example to show how to use SQL statements in phat
to retrieve data in Oracle.
The objectives of this tutorial are to aquant the user with the ROOT version of an
ntuple. Several macros are run, one demonstrates how to use ntuples to make
histograms(1-D,2-D, cuts etc), the other how to chain ntuples together. The last shows how
to read in and plot the hit information save in the hits root file,
PhoHit<RunNumber>s<SequenceNumber>.root.
- Goto the directory ./tutorials/tutorial1/a
- Type:
ls <ENTER>
- You should see two types of files:
Macros: <filename>.C (e.g.
view_ntuple.C,chain_ntuple.C, read_hits.C)
NtupleFiles: <filename>.root (e.g. Tutorial_1_001064s000.root,Tutorial_1_001399s000.root)
- The first exercise will use the view_ntuple.C macro to read in a ntuple
file and plot some histograms using information in the ntuple
- First start a phat, by typing:
phat <ENTER>
(if you don't see a ROOT welcome banner, and a prompt root [0], then something is wrong
and get help to get your phat working)
- Then execute the macro by typing at the prompt, root [0]:
.x view_ntuple.C
<ENTER>
- You will be asked the run number and sequence number. You will have to use a run number
and sequence number that has a root file in this directory, i.e. Run Number=1064,Sequence
Number=0. Run 001064 Seq 0, and Run 1399 Seq 0 files are provided in this directory as (Tutorial_1_001064s000.root,Tutorial_1_001399s000.root)
.
- At the prompt, Run Number (>1):, type
1064 <ENTER>
- At the prompt, Sequence Number (>0): ,type
0 <ENTER>
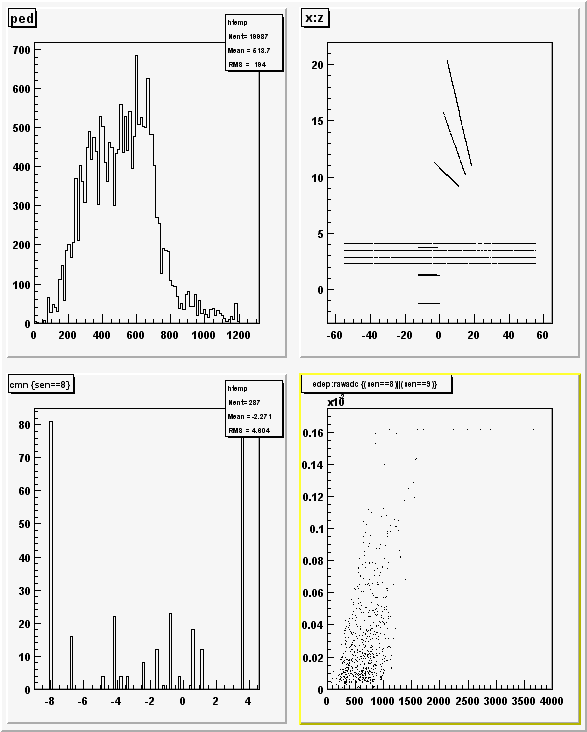
- You should see the following, canvas appear.
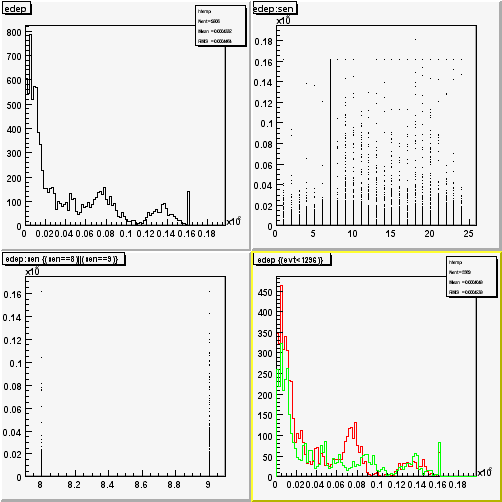
This shows 1-D,2-D histograms with cuts and overlays all generated from the ntuple.
- To see how this was done, edit the file view_ntuple.C. Comments in the macro explain how
the ntuple file was openned, and the ntuple loaded, as well as how to use the ntuple to
make various histograms. Also included is a list of the variables in each histogram.
- Now you can play around and learn how to use ntuple in root. For additional infomation
regarding Ntuple member functions available goto http://root.cern.ch/root/html/TNtuple.html,
http://root.cern.ch/root/html/TTree.html,
http://root.cern.ch/root/html/Tutorial.html
- The second exercise, will use chain_ntuple.C, to read in two ntuple
files and chain them together.
- If you quit phat (by typing :.q <ENTER>) start a phat, by typing:
phat <ENTER>
else goto next instruction.
- Then execute the macro by typing at the prompt, root [0]:
.x chain_ntuple.C
<ENTER>
- This macro will automatically use the ntuple files,(Tutorial_1_001064s000.root,Tutorial_1_001399s000.root),
and chain them together. The following plot will be seen.
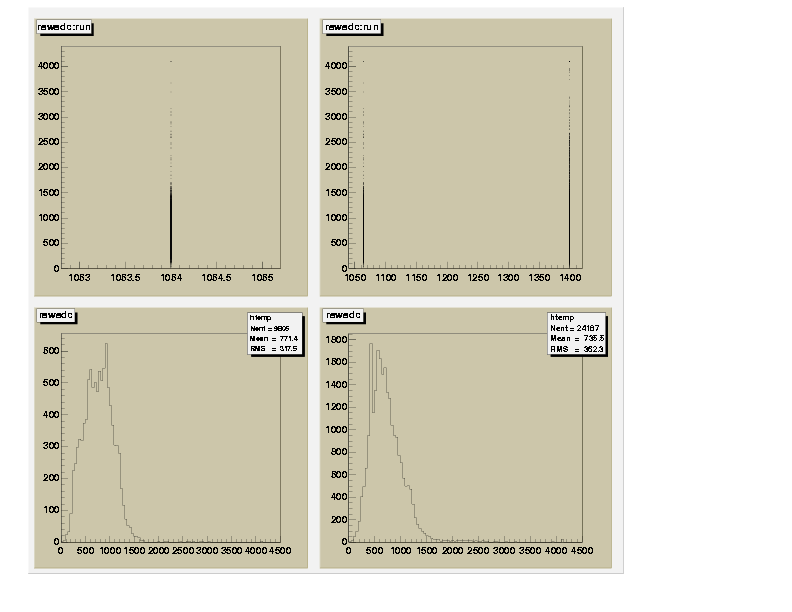
The upper left plot shows one ntuple by itself (i.e. one run number), the upper right
shows the result when both are chained together(two run numbers).
- To see how this was done, edit the file chain_ntuple.C. Comments in the macro explain
how the ntuples were chained together. In fact it is very simple, you create a TChain
object, and then simply add the ntuples to it as you want.
- Now you can play around and learn how to use chaining of ntuples in root. For additional
infomation regarding TChain and TNtuple member functions available goto http://root.cern.ch/root/html/TChain.html,
http://root.cern.ch/root/html/TNtuple.html,
http://root.cern.ch/root/html/TTree.html,
as well as further examples in http://root.cern.ch/root/html/Tutorial.html
- The last exercise, will use the read_hits.C macro, to read in a root
file with signal processed data ("hits" i.e energy calibrated, x,y,z hits) and
make some plots.
- Start a phat, by typing:
phat <ENTER>
- Then execute the macro by typing at the prompt, root [0]:
.x read_hits.C
<ENTER>
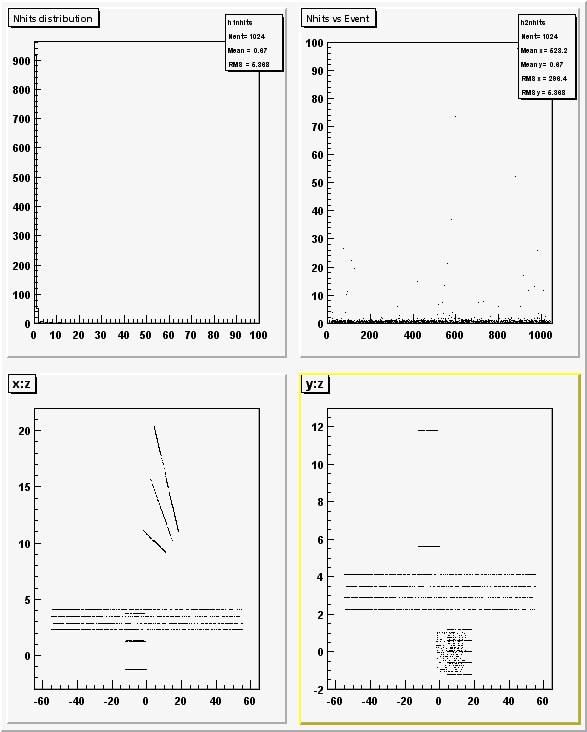
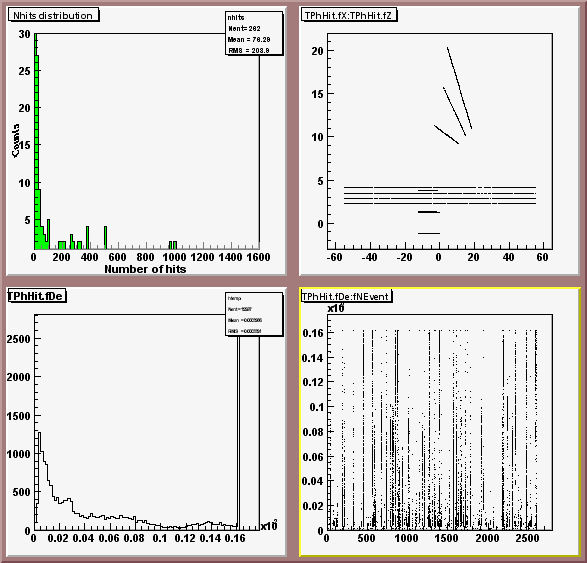
- This macro will automatically use the root file,(PhoHit001064s000.root).
The following plot will be seen
- To see how this was done, edit the file read_hits.C. Comments in the macro explain how
the hits were extracted from the root file, and subsequently plotted.
- You can now play around with reading in information from the Hit file.
The objectives of this tutorial are to aquant the user with how the ntuple used in tutorial 1a was made using a phat macro.
- Goto the directory ./tutorials/stdmacro
- There are several macro files in this directory:
tutorial_std.C
: Main macro, does event processing
Tutorial_Setup.C
: Setup macro, where input filenames/locations defined, and then such files read in
DAQ_TRIGGER_PROCESS.C : Analyzes the DAQ trigger
bit information
Trigger_Init.C
: Initializes variables for trigger counter calibration
Trigger_Process.C
: Applies calibrations to trigger counter raw values
- Before running the macros, you must ensure you are pointing to the correct locations of
the pedestal,calibration,configuration files etc. This is done in the following.
- Edit Tutorial_Setup.C
- Change the following lines to point to the correct locations on your local machine.
const Char_t *Default_RawDataInputDirectory="<YourLocalMachineDataDirectory>";
const Char_t *Default_OutHitsDirectoryName="<YourHitsDataFileDirectory>";
const Char_t *PedestalDirectoryName="<YourLocalMachineDataDirectory>/ped";
const Char_t *GainDirectoryName="<YourLocalMachineDataDirectory>/gain";
Save and exit Tutorial_Setup.C
(Note: Default_RawDataInputDirectory is where your raw data file is, this is used as input
PedestalDirectoryName is where your pedestal files are, this is used as input
GainDirectoryName is where your gain files are, this is used as input
Default_OutHitsDirectoryName is where your processed hits file (with x,y,z,de information)
will be output)
- Goto the directory ./tutorials/tutorial1/b
- There are several macro files in this directory:
Tutorial_Hist_Init.C
: Initializes/Books ntuples
Tutorial_Hist_Fill.C
: Fills ntuples
Tutorial_Hist_Save.C
: Saves ntuples
- Edit Tutorial_Hist_Init.C, change the following line to point to the correct locations
on your local machine.
const Char_t *TutorialHistogramDirectory="<YourTutorialHistogramDirectory>";
Save and exit Tutorial_Hist_Init.C.
(TutorialHistogramDirectory where your tutorial histograms will be output)
- Return back to stdmacros directory,./tutorials/stdmacro
- Now you can run the macro, by typing:
phat <ENTER>
- Run the tutorial macro, by typing:
.x tutorial_std.C
<ENTER>
- You will be asked which tutorial number, by:
1
<ENTER>
- Enter the run number and sequence number at the prompt of the data file in <YourLocalMachineDataDirectory>.
- Your should then see, a listing of the files etc. used in this macro, for example:
***********************************************************
*
Welcome to phobos Tutorial
*
***********************************************************
Please Enter Tutorial number
Tutorial 1: Ntuples; Tutorial 2: Simple Trees; Tutorial 3:Trees
Tutorial Number(>0):1
************************************************************
*
You have chosen Tutorial 1
*
************************************************************
Please enter Run Number
Run Number (>1): 1064
Please enter Sequence Number
Sequence Number (>= 0): 0
************************************************************************
Input Run Number : 1064
Input Sequence Number : 0
************************************************************************
<<<<<< Tutorial_Setup >>>>
*****************************************************************************
* FILES SETUP FOR HITS DATA ANALYSIS *
*****************************************************************************
*
* Input Raw Data file : /data/eng_run/PhoRaw001064s000.root
*
* Output Hits Data file : /data/eng_run/PhoHit001064s000.root
*
* Detector file : /home/nigel/Phat/init/Detector_eg.root
*
* Detector file : /home/nigel/Phat/init/Detector_eg.root
*
* SensorDB map file : /home/nigel/Phat/init/SensorDB_spect_eg.root
*
* FBSensorDB map file : /home/nigel/Phat/phatplastic/inc/trgtof_eng99.dat
*
* Pedestal file : /data/eng_run/ped/PedSiV00r001062.root
*
* Calibration file : /data/eng_run/gain/CalSiV00r001050.root
*
* Histogram file : /data/eng_run/Tutorial_1_001064s000.root
*
*****************************************************************************
tutorial1> Zero suppression calculation.
tutorial1> Event 13;During calibration of hits proceedure, 1 hit out of 2 hits
did not have a good gain to apply
tutorial1> Event 17;During calibration of hits proceedure, 3 hit out of 211 hits
did not have a good gain to apply
tutorial1> Event 30;During calibration of hits proceedure, 3 hit out of 54 hits
did not have a good gain to apply
tutorial1> Event 214 processed
tutorial> Updating histos
tutorial1> Event 414 processed
tutorial> Updating histos
tutorial1> Event 13;During calibration of hits proceedure, 1 hit out of 2 hits
did not have a good gain to apply
tutorial1> Event 614 processed
..........
tutorial1> Event 1414 processed
tutorial> Updating histos
tutorial1> Zero suppression stopped due to lack of data
tutorial1> Closed hits histogram file /data/eng_run/Tutorial_1_001064s000.root
tutorial1> Closed hits file /data/eng_run/PhoHit001064s000.root
tutorial1> tutorial1 successfully completed.
root[1]
If you do not, and there is a problem with files in "FILES SETUP FOR HITS DATA
ANALYSIS" then
check you are pointing to the correct files!
"Zero suppression stopped due to a lack of data" means that you are at the end
of the data (no problem)
- Exit phat by typing:
.q <ENTER>
- To look at the ntuple file you created goto <YourTutorialHistogramDirectory>,
and apply the knowledge from tutorial 1a
to examine it.
- To look at the processed hits file you created goto <YourHitsDataFileDirectory>,
and apply the knowledge from tutorial 1a
to examine it.
- To understand how the macro works, edit the various files in the directories, and read
the comments etc.
- Congratulations! You have now completed Tutorial One.
This tutorial is to demonstrate how to read in an ASCII file and make an ntuple, and
profile histograms. For this tutorial you don't actually need phat, you can just use root.
(Below where ever you see root you can just as easily type phat, as phat contains root)
- Goto the directory: ./tutorials/tutorial1.5
- There are several files in this directory:
PHOFFLINE_SLOW_PARAMETERS_RUN.txt : ASCII file
with RUN , DATE ,RUNTYPE, TEMP, HUMIDITY,
BIAS_VOLTAGE, BIAS_CURRENT
tutorial1.5.C
:Read ASCII file and makes ntuple/profile histos, writes them to root
file("hslow.root")
plot_ntuple.C
: Reads ntuple from "hslow.root" and makes plots
plot_history.C
: Reads profile histos from "hslow.root" and plots them.
read_ntuple.C
: Read ntuple from "hslow.root" and prints out contents. NOTE: This usesthe fact
that a ntuple is a simple TTree, hence this is probably beeter understood after
tutorial 2.
- To make the ntuple and histogram from the ASCII file you need to run the tutorial1.5.C
macro. The following describes this proceedure.
Type:
root <ENTER>
- .At prompt root[0] type:
.x tutorial1.5.C
<ENTER>
- You should see the contents of the ASCII file displayed:
root [0]
Processing tutorial1.5.C...
RUN LOGDATE RUN_TYPE TEMPERATURE
HUMIDITY BIAS_VOLTAGE BIAS_CURRENT
36 6/11/99 UNKNOWN 69.9 1.2 0 0
49 6/13/99 UNKNOWN 50 0.5 0 0
50 6/13/99 UNKNOWN 50 0.6 0 0
51 6/14/99 UNKNOWN 50 0.9 0 0
52 6/14/99 UNKNOWN 50 0.8 0 0
53 6/14/99 UNKNOWN 50 0.8 0 0
54 6/14/99 UNKNOWN 50 0.9 0 0
55 6/15/99 UNKNOWN 40 0.5 0 0
56 6/15/99 UNKNOWN 40 0.6 0 0
57 6/15/99 SICAL 69.9 1.3 0 0
.......
- When it is finished, at the prompt root[1], type:
.q <ENTER>
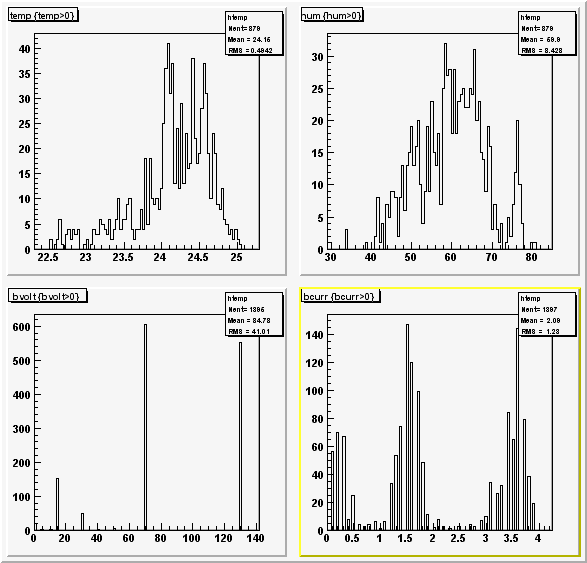
- You have now created a new file called "hslow.root" which contains the ntuple
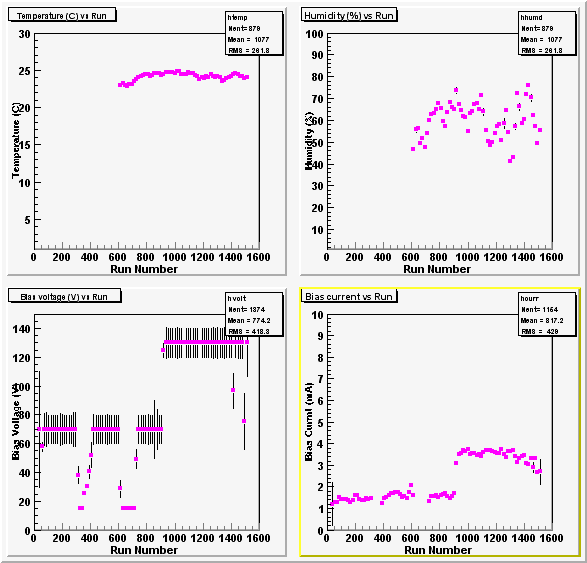
of the information in the text file as well as some profile histograms:
NTUPLE NAME
Variables
ntuple :
"run:temp:hum:bvolt:bcurr"
HIST NAME
HIST
TITLE
htemp :
"Temperature (C) vs Run"
hhumd :
"Humidity (%) vs Run"
hvolt
: "Bias Voltage vs Run"
hcurr
: "Bias Current vs Run"
To understand the details of how this was done edit the macro tutorial1.5.C and read the
comments for explanation.
- The macro plot_ntuple.C reads the ntuple from the file "hslow.root" and makes
the following plots:
- To run the macro type:
root plot_ntuple.C <ENTER>
To exit root, at prompt root[1], type:
.q <ENTER>
To understand the details of how this was done edit the macro and read the comments
for explanation.
- The macro plot_history.C reads the profile histograms from the file
"hslow.root" and makes the following plots:
- To run the macro type:
root plot_history.C <ENTER>
To exit root, at prompt root[1], type:
.q <ENTER>
To understand the details of how this was done edit the macro and read the comments for
explanation.
- The macro read_ntuple.C reads the ntuple from the file "hslow.root" and
outputs a list of the variables in the ntuple.
- To run the macro type:
root read_ntuple.C <ENTER>
To exit root, at prompt root[1], type:
.q <ENTER>
To understand the details of how this was done edit the macro and read the comments for
explanation. This macro uses the fact that a TNtuple is actually a simple TTree object.
Hence it uses some TTree specific information, that is introduced in Tutorial2. It might
be better to wait unitl you have done tutorial 2 and then come back to this macro.
- Congratulations! You have finished tutorial 1.5.
The objectives of this tutorial are to aquant the user with the ROOT TTree objects. To
get general idea about trees please goto Tree Intoduction.
The first macro uses a tree that is constructed just like an ntuple,
except it shows that unlike an ntuple it can have data variables of any basic type. Even
character variables are allowed in trees. The second macro uses a tree that consists of
elements that are objects, and lists of objects. The second macro illustrates not only
that objects can be stored in trees, but that easy access to the objects data members can
be achieved. Hence these to show that trees are far more flexible than ntuples and ideal
for DST (Data Summary Tape) storage.
- Goto the directory ./tutorials/tutorial2/a
- Type:
ls <ENTER>
- You should see two types of files:
Macros: <filename>.C (e.g. read.C,read_hit_tree.C)
TTreeFiles: <filename>.root (e.g. Tutorial_2_001064s000.root,PhoHit001064s000.root)
- The first exercise will use the read.C macro to read in a root file(Tutorial_2_001064s000.root,)
with a tree inside (siTree) and plot some histograms using information in
the tree
- First start a phat, by typing:
phat <ENTER>
(if you don't see a ROOT welcome banner, and a prompt root [0], then something is wrong
and get help to get your phat working)
- Then execute the macro by typing at the prompt, root [0]:
.x read.C <ENTER>
- You should see the following, canvas appear.
 .
.
This shows 1-D,2-D histograms with cuts and overlays all generated from the tree.
- To see how this was done, edit the file read.C. Comments in the macro explain how the
root file was openned, and the TTree (siTree) loaded, as well as how to use the tree to
make various histograms. Output in the command line window, is a list of the entries of
the file:
TFile** Tutorial_2_001064s000.root
<-Filename
TFile* Tutorial_2_001064s000.root
KEY: TNtuple pl_nt;1 Plastic data from run 1064
<- contents of file, TNtuple and TTree
KEY: TTree siTree;1 Si Hits ROOT Tree
***************************************************
*Tree :siTree : Si Hits ROOT Tree *
<- Information about name and title of tree
*Entries : 19987 : Total Size = 2204894 bytes File Size = 570590 * <-number
of entries in tree
* : : Tree compression factor = 1.00 *
**************************************************
*Branch :EventHeader : run/I:event/I *
<-Branch title ("EventHeader"), and variables
*Entries : 19987 : Total Size = 173056 bytes File Size = 0 *
< run and event (these are know as leaves)
*Baskets : 169 : Basket Size = 1024 bytes Compression= 1.00 *
*............................................................................*
*Branch :SiHitsData : sen/I:row/I:col/I:x/F:y/F:z/F:rawadc/F:ped/F:cmn/F: *
<-Branch title ("SiHitsData"), and variables
* | noise/F:gain/F:edep/F:chip/I:name/C *
<-Note: can have integer, floats or Character
*Entries : 19987 : Total Size = 1461248 bytes File Size = 0 *
< values stored in tree(as denoted by /I,/F,/C)
*Baskets : 1427 : Basket Size = 1024 bytes Compression= 1.00 *
*............................................................................*
- Now you can play around and learn how to use trees,branches and leaves in root. For
additional infomation regarding TTree member functions available goto http://root.cern.ch/root/html/TTree.html,
http://root.cern.ch/root/html/Tutorial.html
- The last exercise, will use the read_hit_tree.C macro, to read in a
root file with signal processed data ("hits" i.e energy calibrated, x,y,z hits)
and make some plots. In tutorial1 the hits were inside the event objects inside the root
file and had to be extracted and then plotted. However in this tutorial the hits were
saved in a tree structure to the file, which allows them to be drawn directly from the
file! (The advantage with trees!)
- If you quit phat (by typing :.q <ENTER>) start a phat, by typing:
phat <ENTER>
- Then execute the macro by typing at the prompt, root [0]:
.x read_hit_tree.C
<ENTER>
- You should see the following, canvas appear.
This shows 1-D,2-D histograms generated directly from the tree which contains the
hits.
- To see how this was done, edit the file read_hit_tree.C. Comments in the macro explain
how the root file (PhoHit001064s000.root) was openned, and the TTree (Tree)
loaded, as well as how to use the tree to make various histograms. Output in the command
line window, is a list of the entries of the file, as well as the tree::
TFile** PhoHit001064s000.root
TFile* PhoHit001064s000.root
KEY: TH1F nhits;1 Nhits distribution
KEY: TTree Tree;1 An example root file with Event/hits Output
*****************************************************
*Tree :Tree : An example root file with Event/hits Output *
*Entries : 2587 : Total Size = 2015512 bytes File Size = 191512 *
* : : Tree compression factor = 1.00 *
*****************************************************
*Branch :TPhEventHeader : TPhEventHeader *
<- Branch name "TPhEventHeader" , the branch
*Entries : 2587 : BranchObject (see below) *
<- contains a single object of class TPhEventHeader
*............................................................................*
*Branch :fNRun : fNRun *
<Data member of class TPhEventHeader
*Entries : 2587 : Total Size = 0 bytes File Size = 0 *
<assessible directly from file for drawing etc
*Baskets : 0 : Basket Size = 64000 bytes Compression= 1.00 *
*............................................................................*
*Branch :fNEvent : fNEvent *
<Data member of class TPhEventHeader
*Entries : 2587 : Total Size = 0 bytes File Size = 0 *
<assessible directly from file for drawing etc
*Baskets : 0 : Basket Size = 64000 bytes Compression= 1.00 *
*............................................................................*
.
.
.
*Branch :fBits : fBits *
<Data member of class TPhEventHeader
*Entries : 2587 : Total Size = 0 bytes File Size = 0 *
<assessible directly from file for drawing etc
*Baskets : 0 : Basket Size = 64000 bytes Compression= 1.00 *
*............................................................................*
*Branch :TPhHit_ : TPhHit_/I *
<- Branch name "TPhHit_" , the branch
*Entries : 2587 : Total Size = 0 bytes File Size = 0 *
<contains a objects of class TPhHit
*Baskets : 0 : Basket Size = 32000 bytes Compression= 1.00 *
*............................................................................*
*Branch :TPhHit.fLabel : fLabel[TPhHit_]/I *
<Data member of class TPhHit
*Entries : 2587 : Total Size = 96000 bytes File Size = 0 *
<assessible directly from file for drawing etc
*Baskets : 3 : Basket Size = 32000 bytes Compression= 1.00 *
*............................................................................*
.
.
.
*............................................................................*
*Branch :TPhHit.fBits : fBits[TPhHit_]/i *
<Data member of class TPhHit
*Entries : 2587 : Total Size = 96000 bytes File Size = 0 *
<assessible directly from file for drawing etc
*Baskets : 3 : Basket Size = 32000 bytes Compression= 1.00 *
*............................................................................*
Plotting.
Done.
root [1] .q
- Now you can play around and learn how to use trees,branches and leaves in root. For
additional infomation regarding TTree member functions available goto http://root.cern.ch/root/html/TTree.html,
http://root.cern.ch/root/html/Tutorial.html
- To see how to generate these tree files go on to tutorial 2 b.
The objectives of this tutorial are to aquant the user with how the trees used in
tutorial 2a were made using a phat macro.
- Goto the directory ./tutorials/stdmacro
- There are several macro files in this directory:
tutorial_std.C
: Main macro, does event processing
Tutorial_Setup.C
: Setup macro, where input filenames/locations defined, and then such files read in
DAQ_TRIGGER_PROCESS.C : Analyzes the DAQ trigger
bit information
Trigger_Init.C
: Initializes variables for trigger counter calibration
Trigger_Process.C
: Applies calibrations to trigger counter raw values
- Before running the macros, you must ensure you are pointing to the correct locations of
the pedestal,calibration,configuration files etc. This was described in Tutorial 1b section 3 and 4. Additional changes relevant to this
tutorial are now described.
- Goto the directory ./tutorials/tutorial2/b
- There are several macro files in this directory:
Tutorial_Tree_Init.C
: Initializes/Books Simple Tree (like ntuple except has integers,characters and floats)
Tutorial_Tree_Fill.C
: Fills Simple Tree
Tutorial_Tree_Save.C
: Saves Simple Tree
Hit_Tree_Init.C
: Initializes/Books Advanced Tree (with objects, and lists of objects)
Hit_Tree_Fill.C
: Fills Advanced Tree
Hit_Tree_Save.C
: Saves Advance Tree
- Edit Tutorial_Tree_Init.C, change the following line to point to the correct locations
on your local machine.
const Char_t *TutorialHistogramDirectory="<YourTutorialHistogramDirectory>";
Save and exit Tutorial_Hist_Init.C.
(TutorialHistogramDirectory where your tutorial histograms/simple tree file will be
output)
- Return back to stdmacros directory,./tutorials/stdmacro
- Now you can run the macro, by typing:
phat <ENTER>
- Run the tutorial macro, by typing:
.x tutorial_std.C
<ENTER>
- You will be asked which tutorial number, by:
2
<ENTER>
- Enter the run number and sequence number at the prompt of the data file in <YourLocalMachineDataDirectory>.
- Your should then see, a listing of the files etc. used in this macro, for example:
***********************************************************
*
Welcome to phobos Tutorial
*
***********************************************************
Please Enter Tutorial number
Tutorial 1: Ntuples; Tutorial 2: Trees;
Tutorial Number(>0):2
************************************************************
*
You have chosen Tutorial 2
*
************************************************************
Please enter Run Number
Run Number (>1): 1064
Please enter Sequence Number
Sequence Number (>= 0): 0
************************************************************************
Input Run Number : 1064
Input Sequence Number : 0
************************************************************************
<<<<<< Tutorial_Setup >>>>
*****************************************************************************
* FILES SETUP FOR HITS DATA ANALYSIS *
*****************************************************************************
*
* Input Raw Data file : /data/eng_run/PhoRaw001064s000.root
*
* Output Hits Data file : /data/eng_run/PhoHit001064s000.root
*
* Detector file : /home/nigel/Phat/init/Detector_eg.root
*
* Detector file : /home/nigel/Phat/init/Detector_eg.root
*
* SensorDB map file : /home/nigel/Phat/init/SensorDB_spect_eg.root
*
* FBSensorDB map file : /home/nigel/Phat/phatplastic/inc/trgtof_eng99.dat
*
* Pedestal file : /data/eng_run/ped/PedSiV00r001062.root
*
* Calibration file : /data/eng_run/gain/CalSiV00r001050.root
*
* Histogram file : /data/eng_run/Tutorial_2_001064s000.root
*
*****************************************************************************
.
.
LISTING OF TREE Contents.....
.
.
tutorial2> Zero suppression calculation.
tutorial2> Event 13;During calibration of hits proceedure, 1 hit out of 2 hits
did not have a good gain to apply
tutorial2> Event 17;During calibration of hits proceedure, 3 hit out of 211 hits
did not have a good gain to apply
tutorial2> Event 30;During calibration of hits proceedure, 3 hit out of 54 hits
did not have a good gain to apply
tutorial2> Event 214 processed
tutorial> Updating histos
tutorial2> Event 414 processed
tutorial> Updating histos
tutorial2> Event 13;During calibration of hits proceedure, 1 hit out of 2 hits
did not have a good gain to apply
tutorial2> Event 614 processed
..........
tutorial2> Event 1414 processed
tutorial> Updating histos
tutorial2> Zero suppression stopped due to lack of data
tutorial2> Closed hits histogram file /data/eng_run/Tutorial_2_001064s000.root
tutorial2> Closed hits file /data/eng_run/PhoHit001064s000.root
tutorial2> tutorial2 successfully completed.
root[1]
If you do not, and there is a problem with files in "FILES SETUP FOR HITS DATA
ANALYSIS" then
check you are pointing to the correct files!
"Zero suppression stopped due to a lack of data" means that you are at the end
of the data (no problem)
- Exit phat by typing:
.q <ENTER>
- To look at the ntuple file you created goto <YourTutorialHistogramDirectory>,
and apply the knowledge from tutorial 2a
to examine it.
- To look at the processed hits file you created goto <YourHitsDataFileDirectory>,
and apply the knowledge from tutorial 2a
to examine it.
- To understand how the macro works, edit the various files in the directories, and read
the comments etc.
- Congratulations! You have now completed Tutorial Two.
The tutorial files exist in a gzipped tar file(called tutorial_macros.tar.gz), on
/disk20000/phobos/disk0/tutorials. The directory structure is
/tutorials
/stdmacro
/tutorial1
/tutorial1.5
/tutorial2
/tutorial3 /tutorial4
/a /b
/a /b
Proceedure:
- Download the tar file, tutorial_macros.tar.gz, into
the directory you want the above tutorial structure to exist.
- Ungzip the file by typing:
gunzip
tutorial_macros.tar.gz <ENTER>
- Create the tutorial directory where you want to work, by typing:
tar -vxf tutorials.tar
<ENTER>
- A new directory, ./tutorials, should exist with the following directory structure.
/tutorials
/stdmacro
/tutorial1
/tutorial1.5
/tutorial2
/tutorial3 /tutorial4
/a /b
/a
/b
Inside /stdmacro, are the standard macros that are run to analyse
the data and produce the histogram and data output files.
Inside tutorial1/2 are the a and b directories. Inside the /a
directories are the ntuples and trees files, with macros, that allow you to view their
contents. Inside the /b directories are the macros that make the files in /a.
Inside tutorial1.5 is a macro to make an ntuple and histograms
from an ASCII file, as well as other macros to view the ntuple and histograms.
Inside Tutorial3: Under development.
- Login to rcf (the gateway), by typing:
ssh rcf.rhic.bnl.gov <ENTER>
- Goto to processor than can see disk20000, by typing:
ssh rsun00 <ENTER>
- At prompt <user>@rsun00 ~>, type:
cd /disk20000/phobos/disk0/tutorials <ENTER>
- Transfer tar file to your data directory, by typing:
scp tutorial_macros.tar.gz
<YourUserName>@<YourLocalMachine>:<YourTutorialMacrosDirectory>
<ENTER>
(eg: scp tutorial_macros.tar.gz nigel@kiwi.chm.bnl.gov:/home/nigel/learn
<ENTER>)
- When complete, logout of rsun00 and then rcf by typing (twice):
exit <ENTER>
- On your local machine, goto your data directory(i.e where you put tar file) by typing:
cd <YourTutorialMacrosDirectory> <ENTER>
- You have now downloaded the file!
The pedestal and calibration files exist on /disk20000 in a tar file, you have to
retrive this file from /disk20000 and untar them onto your local machine. This proceedure
is described below.
- Login to rcf (the gateway), by typing:
ssh rcf.rhic.bnl.gov <ENTER>
- Goto to processor than can see disk20000, by typing:
ssh rsun00 <ENTER>
- At prompt <user>@rsun00 ~>, type:
cd /disk20000/phobos/disk0/EngRunOnlinePedCalibFiles
- Transfer tar file to your data directory, by typing:
scp pedgain.tar
<YourUserName>@<YourLocalMachine>:<YourLocalMachineDataDirectory>
- When complete, logout of rsun00 and then rcf by typing:
exit <ENTER>
- On your local machine, goto your data directory(i.e where you put tar file) by typing:
cd <YourLocalMachineDataDirectory>
- Untar the pedestal and gain files, by typing:
tar -xvf pedgain.tar
- There should now exist two additional directories in
<YourLocalMachineDataDirectory>, called ped and gain.
Inside these directories are the pedestal and calibration files that are used by signal
processing.
The raw data files exist in HPSS(High Performance Storage System). The following is a
proceedure for retriving a file from HPSS and putting on your local machine.
- Create/Assign a directory for your data , <YourLocalMachineDataDirectory>(e.g.
/data).
- Determine the run and sequence number you want (eg. RunNumber=1064,SequenceNumber=0).
- Login to the rcf machine by typing:
ssh rcf.rhic.bnl.gov <ENTER>
(Make sure you have an account on rcf and have an ssh deamon running on your machine
etc..)
- Goto to rsun00 by typing:
ssh rsun00 <ENTER>
- At prompt, rsun00 ~>, type:
cd /disk20000/phobos/scratch
- Make your own temporary directory for the data file, by typing:
mkdir <YourDisk20000DirectoryName> <ENTER>
- Go to that directory, by typing:
cd <YourDisk20000DirectoryName> <ENTER>
- Type:
rftp <ENTER>
- Goto the phobsink engineering run directory:
cd /home/phobsink/engrun/data <ENTER>
- Locate the file with the run number and sequence number you want,
PhoRaw<RunNumber>s<SequenceNumber>.root
(e.g. PhoRaw001064s000.root).
- Then tranfer that file to your directory on /disk20000 by typing:
mget <filename> <ENTER>
- When transfer complete type:
bye <ENTER>
- Copy the file you just transfered to your local machine by typing
scp <filename>
<YourUserName>@<YourLocalMachine>:<YourLocalMachineDataDirectory>
<ENTER>
(e.g. scp PhoRaw001064s000.root nigel@kiwi.chm.bnl.gov:/data
<ENTER>)
- When transfer complete remove the file and directory (to save space on
disk20000!), by typing:
rm <filename> <ENTER>
cd ..
rmdir <YourDisk20000DirectoryName> <ENTER>
- Logout of the rsun00 machine by typing:
exit
<ENTER>
- Logout of the rcf machine by typing:
exit
<ENTER>
- You now have downloaded a data file to use!
In this section a brief introduction to the basic concept of a tree is given. The tree
in tutorial 2a is used to illustrate the ideas.
The following shows the TTree structure of the tree viewable by the read.C macro in
tutorial 2a.
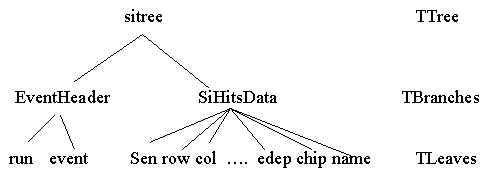
The TTree object is a way of storing data in an organised, and
easily retrivable, manner. In some sence it is like a directory structure in a file. First
one has the TTree object (sitree is a particular example of one). This is like the base
directory /sitree. Attached to the TTree are TBranch objects, which allow you to group
data in a logical manner. TBranches are like subdirectories (/sitree/EventHeader and
/sitree/SiHitsData). Attached to the TBranches are the actual data items themselves (e.g.
run, event numbers etc..). These are known as TLeaves. TLeaves are like the specfic files
in the directory structure.
Ok, I get what a tree is, but how does it work? (In following
give general idea, specific code is in tutorials)
1) Create a tree. Create branches and attach to the tree. Create leaves and attach them
to branch.
2) For each leaf, there is a data item that you want to associate with it. For example,
the leaf "run" has to hold the value of the variable RunNumber. This association
is done by telling the leaf "run" the address of the variable RunNumber.
Therefore you have to associate the all the leaves created with a data item.
3) Having done 2, the leaves all know the variables associated with them. But nothing is
done until you say tree->Fill(). At that stage the current values of the variables
associated with the leaves is then stored/placed into the tree. This storage of all the
variables is known as one event. If you were then do some more processing and then say
tree->Fill(), then the new values of the variables saved would be another event, etc...
4) Once finished filling the tree, write it to a file (tree->Write()). Then you can
load it back in and look at the data, event by event etc..
The macros in tutorial 2a show how to look at the data written in a tree. The macros in
./tutorial2/b and ./stdmacro show how to create and fill trees.
With this brief intro, you should now be able to understand the tutorials.
Note: In fact you can store more than just simple types in a tree, you can also
store objects, and lists of objects (TClonesArray). In addition the tree gives you the
ablity to look at the data members of the objects directly from the file.
The objectives of this tutorial are to show the user how to examine
the contents of a raw data file. The following paragraph which descibes how the raw data
is formated is a little intense you might want to just run the tutorial and come back to
this then.
The engineering run raw data is output as a tree (called phatdaq_tree).
It is a tree with one branch (called "Event") that
has one leaf. The data item associated with this leaf is a TPhSubEventArray object. The
TPhSubEventArray object is
in essence an array/list of objects. The objects stored in this TPhSubEventArray
object/array are TPhRawHitFECn0 objects (these are the classes with the Si raw data, there
exists one instance of this class for each FEC) and TPhDataObject objects (These general
data holding objects are used to store the plastic raw data (instance with name
"PLASTIC") and the scalar raw data (instance with name "TRIG"))
- Goto the directory ./tutorials/tutorial3
- Type:
ls <ENTER>
- You should see the macro read_event_example.C.
- This exercise will use the read_event_example.C macro to read in a raw
data file and dump the raw data from the header and scalar data in each event. (You can
get a dump of the Si and Plastic also, by editing the macro)
- First start a phat, by typing:
phat <ENTER>
(if you don't see a ROOT welcome banner, and a prompt root [0], then something is wrong
and get help to get your phat working)
- Then execute the macro by typing at the prompt, root [0]:
.x
read_event_example.C("<YourLocalMachineDataDirectory>/PhoRaw<RunNumber>s000.root")
<ENTER>
- Your should see output similar to the following:
root [0]: .x read_event_example.C("/data/eng_run/PhoRaw001064s000.root")
Warning: File "time.h" already loaded
Open and process Phobos data file /data/eng_run/PhoRaw001064s000.root.
Usage:
read_event_example.C(filename)
TFile** /data/eng_run/PhoRaw001064s000.root
<- The following is a list of the contents of the raw data file
TFile* /data/eng_run/PhoRaw001064s000.root
<- It shows the contents is a TTree object called
KEY: TTree phatdaq_tree;8 PHOBOS DAQ tree 990608
<- "phatdaq_tree"
KEY: TTree phatdaq_tree;7 PHOBOS DAQ tree 990608
KEY: TTree phatdaq_tree;6 PHOBOS DAQ tree 990608
KEY: TTree phatdaq_tree;5 PHOBOS DAQ tree 990608
KEY: TTree phatdaq_tree;4 PHOBOS DAQ tree 990608
KEY: TTree phatdaq_tree;3 PHOBOS DAQ tree 990608
KEY: TTree phatdaq_tree;2 PHOBOS DAQ tree 990608
KEY: TTree phatdaq_tree;1 PHOBOS DAQ tree 990608
KEY: TPhRun RUN_1064;1
<- Plus a TPhRun object with General run info
Event 0
<- Event Number
Run 0, event 0, selected events 0
******************* Header *************************************
<Dump of TPhEventHeader
TPhEventHeader Run: 1064 Event: 0 Trig: 16640 Date: 933388405 929154483 Detector: 0
< object for this event
Parameters:
si event_data_run_trig_type 5 02 000 00 01 00005
plastic event_data_run_trig_evn 5 02 002 00 04 00001
******************************************************************
TPhEventHeader Run: 1064 Event: 0 Trig: 16640 Date: 933388405 929154483 Detector: 0
Parameters:
si event_data_run_trig_type 5 02 000 00 01 00005
plastic event_data_run_trig_evn 5 02 002 00 04 00001
******************************************************************
TPhEventHeader Run: 1064 Event: 0 Trig: 16640 Date: 933388405 929154483 Detector: 0
Parameters:
si event_data_run_trig_type 5 02 000 00 01 00005
plastic event_data_run_trig_evn 5 02 002 00 04 00001
** Contents of TPhSubEventArray for this event **
<- The content of the branch "Event"
TPhSubEventArray Name: event_1064_0
<-contains a TPhSubEventArray object
TPhRawHitFECn0Eng99 Name:FEC_1
< The objects contained in this object are
TPhRawHitFECn0Eng99 Name:FEC_2
<listed here.
TPhRawHitFECn0Eng99 Name:FEC_3
TPhRawData Name:Plastic
TPhRawData Name:Trig
*************************************************
Length=64
< Dump of the scalar
>>TPhRawData<< Name: Trig
< raw data
0000:2fd35984 000002b6 00369980 003230d8 00000000 00b37037 0065e91e 00000000
0020:e833027a 00000000 00000000 00000000 00000000 00000000 00000000 00000000
Hit <ENTER> to continue
<Hit Enter to look at next event
- Continue as desired. To see how this works, edit the read_event_example.C macro and read
comments etc. If you
want to see other dumps, at the beginning of the file are DUMP_FEC_INFO,DUMP_PLASTIC_INFO
boolen variables that can be set to true, to enable their respective raw data to be
viewed.
This tutorial consists of just one macro, get_db_sensormap.C. It is
an example macro, to show how to use SQL statements in phat to retrieve data in
Oracle.
- Goto the directory ./tutorials/tutorial4
- Type:
ls <ENTER>
- You should see the macro get_db_sensormap.C .This macro asks for a run
number and then prints out the Sensor Name, Module Type, FEC Number, String Number,Channel
Number, Row,Column, Bonding Pattern, Pad, Chip Number, for every connected channel.
- To run the macro, type:
phat get_db_sensormap.C<ENTER>
- You will asked for a run number, type in one and hit enter. You should see a large list
of the above information.
- To understand how this works, edit get_db_sensormap.C, and read the comments etc.
- You should now be able to generalise this example to be able to retrieve data from
Oracle. The list of tables available are at
http://www.bnl.gov/phobos/Private/useful_links_for_phobos_asp_prog.htm
(Goto Internal page and click on "Useful links for Phobos ASP/Database
programmers"). For questions regarding the protocal for using SQL statements please
contact George Heintzelman (gah@bnl.gov).